How to make hardtack relates directly to the creation of a durable, long-lasting biscuit ideal for prolonged storage and providing essential nourishment in survival situations. It is also known as the original MRE (meals ready to eat) because Its longevity and simple ingredients make it an ideal option for long-term storage. It’s also a great source of sustenance during emergencies.
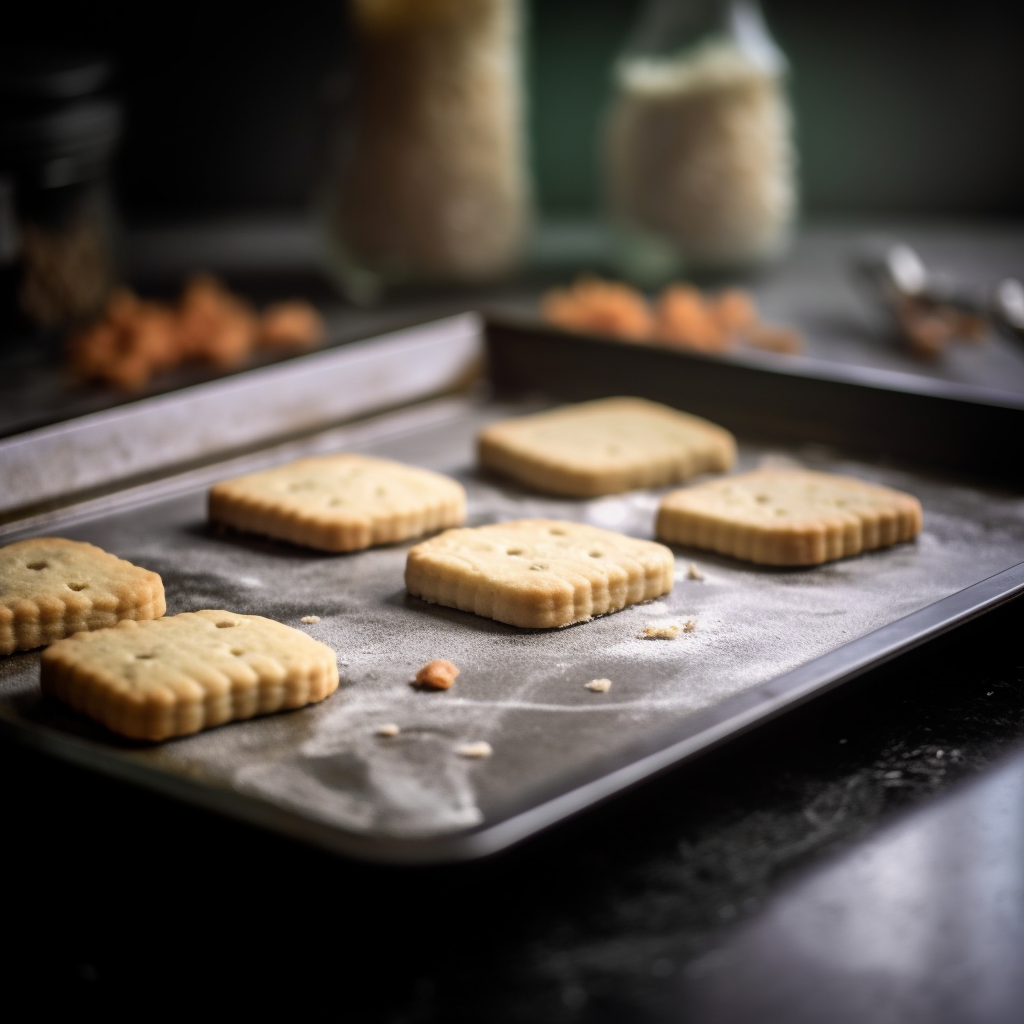
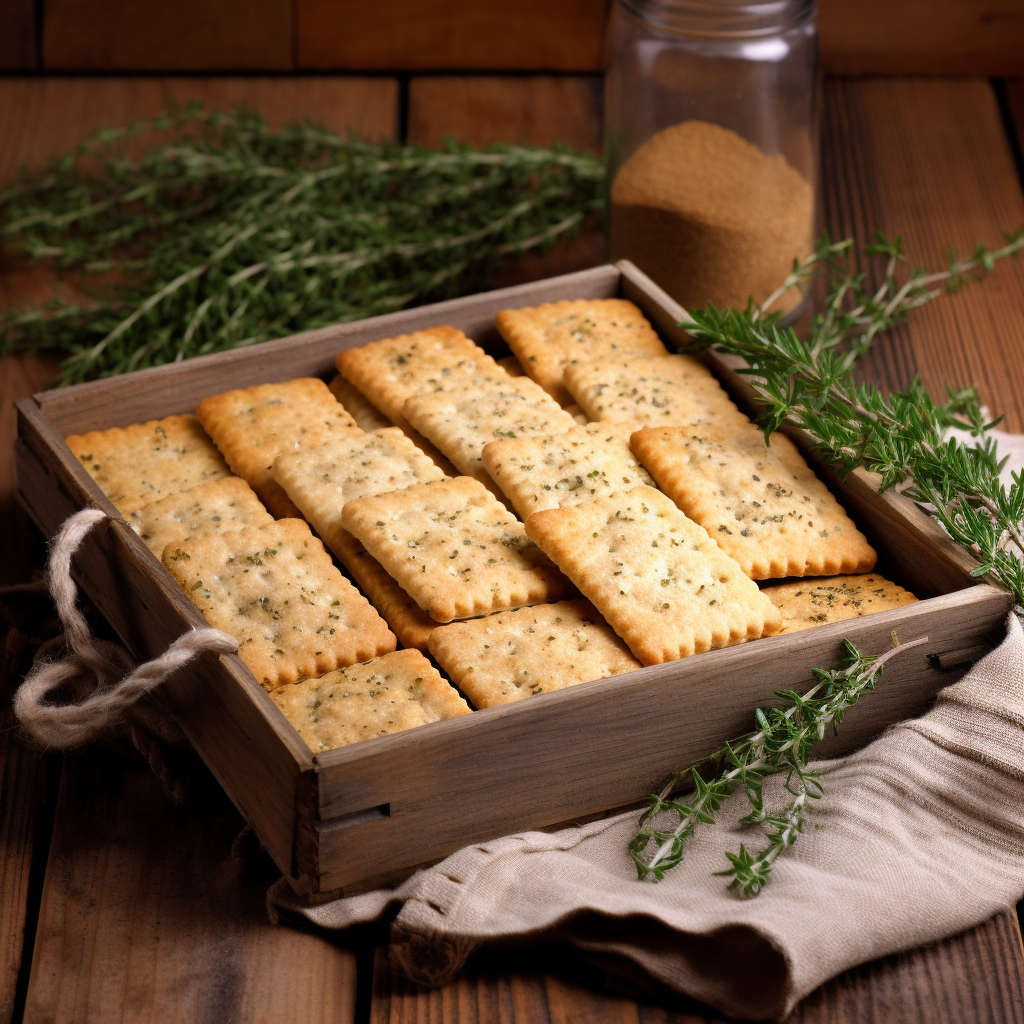
To make hardtack, mix flour, salt and water into a stiff dough. Roll it out, cut squares, and poke it with a fork. Bake it at 375 °F for 30 minutes until lightly browned, and you’re done!
Easy to make… right? Absolutely. But don’t be fooled, there’s more to this humble biscuit than meets the eye.
So, don’t go anywhere! Let’s learn how to make hardtack. We’re about to dive into the exciting world of hardtack, revealing tips and secrets that’ll take your survival food game to a new level. Read on to discover more.
Hardtack is a simple, long-lasting cracker made from flour and water. It is also known as hardtack biscuits, crackers, bread, tooth dullers, or ship’s biscuits.
From seafaring voyages to military campaigns, hardtack has played a significant role in history, providing sustenance to sailors, soldiers, and pioneers during their extensive explorations and battles.
Its hard, cracker-like texture may seem unappealing, but it has sustained many when other food options were unavailable.
Don’t expect it to taste like your favorite snack. Hardtack is traditionally a very hard, thick cracker that is slightly salty with a bland flavor. However, when coupled with stews or soups, it can become quite appetizing, as it soaks up the surrounding flavor and its texture softens.
Warning: There is a reason it is called hardtack, consuming it alone could crack a tooth. The best way to enjoy hardtack is soaked in liquids, such as soup, stew, coffee, tea or water. Similar to how one might dip a biscotti or other hard cookie into coffee.
If you’re not a fan of the bland flavor, don’t worry. Read on to learn how to make hardtack a bit tastier.
Quick History Of Hardtack
The rich history of hardtack stretches from ancient seafaring ventures to its role as a crucial ration alongside salt pork and corned beef during the American Civil War. Nobody knows when it was actually invented, but there are pieces of hardtack dating back over 6,000 years ago.
It was the mainstay on long sea voyages during the Age of Exploration, nourishing sailors on ships like Columbus and Magellan.
In the United States, hardtack played a significant role during the American Civil War. It was a staple food for both Union and Confederate soldiers during the war. Early American settlers and pioneers also consumed it as they ventured westward.
So as you can see, this humble biscuit has been a quiet hero in history’s background, always ready when a durable, reliable food source was needed.
What You Need To Make Hardtack At Home
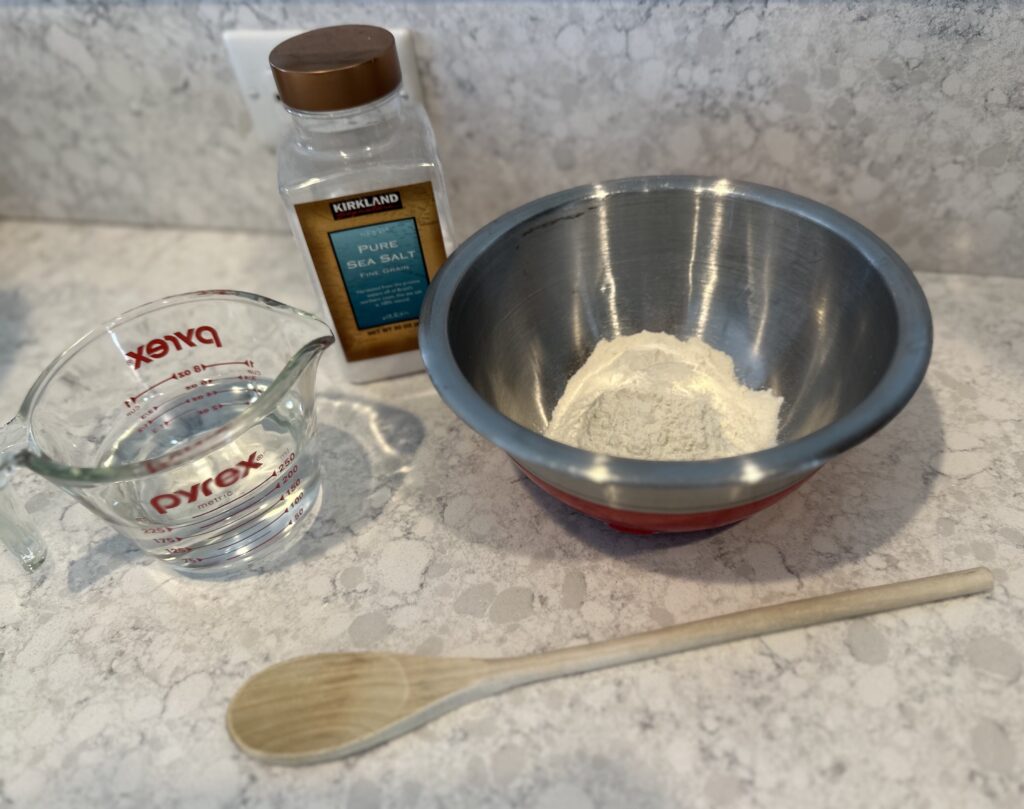
The process of learning how to make hardtack at home requires minimal ingredients: primarily flour and water, with an optional addition of salt for enhanced flavor. Other than that, here are the materials needed:
Mixing bowl
Measuring cups and spoons
Wooden spoon or spatula
Rolling pin
Cookie cutter or knife
Fork or skewer
Baking sheet
Parchment paper or silicone baking mat
Oven mitts
Cooling rack
3 Recipes On How To Make Hardtack
Hardtack comes in with traditional, modern, and sweet variations to suit diverse preferences and nutritional needs.
1. Traditional Hardtack Recipe
The traditional hardtack recipe involves basic ingredients like flour and water, yielding a baked biscuit robust enough for lengthy preservation and portability.
Ingredients:
2 cups of all-purpose flour
1 cup of water
1 1/2 Teaspoons Salt (Optional)
Instructions:
Preheat your oven to 375°F (190°C).
2. Mix the flour and water in a bowl until a stiff dough forms. You may need to adjust the flour or water to achieve the correct consistency.
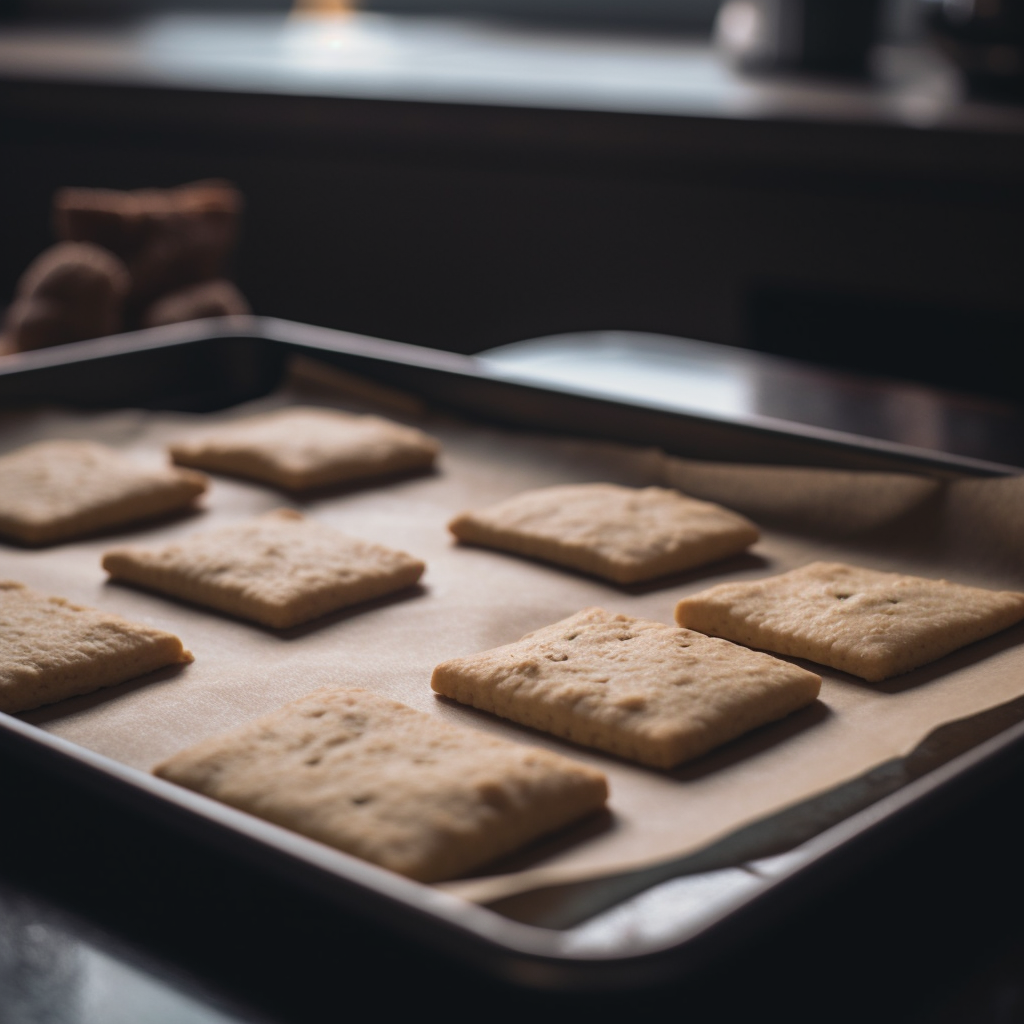
3. Roll the dough out on a floured surface until it’s about 1/4-inch thick.
4. Cut the dough into squares or rectangles and poke holes using a fork or skewer in each piece to allow it to cook evenly and prevent it from puffing up. The holes will also help moisture evaporate which is what you want.
5. Transfer the pieces to a baking sheet and bake for 30-40 minutes or until the edges are golden brown. Flip the hardtack halfway through the baking time to ensure even cooking.
6. Remove the hardtack from the oven and let it cool completely on a wire rack. Once cooled, store the hardtack in an airtight container in a cool, dry place.
2. Modern Hardtack Recipe
The modern hardtack recipe integrates additional items like millet, offering a flavorful twist and augmented nutritional content to the conventional cracker formula.
This modern recipe for hardtack incorporates a few tweaks for a more flavorful and enjoyable alternative to the traditional version.
Although not as long-lasting as the original recipe, it’s still quite durable. Plus, it’s perfect for outdoor adventures or emergency food supplies.
Preheat your oven to 350°F (175°C) and line a baking sheet with parchment paper or a silicone baking mat.
2. In a large mixing bowl, combine the whole wheat flour, all-purpose flour, cornmeal, rolled oats, sugar, salt, and baking powder. Mix well to ensure all the ingredients are evenly distributed.
3. Add the vegetable oil or melted butter to the dry ingredients and mix until you have a crumbly texture.
4. Gradually add water to the mixture, stirring until a stiff dough forms. You may need to adjust the amount of water slightly depending on the flour types and humidity.
5. Transfer the dough onto a lightly floured surface and roll it out to a thickness of about 1/4 inch.
6. Cut the dough into 3-inch squares approximately, or use a cookie cutter for different shapes.
7. Use a fork or skewer to poke holes in each hardtack piece. This helps with even baking and prevents puffing up during the process.
8. Place the hardtack pieces onto a baking sheet. Leave some space between them for even baking.
9. Bake for 25-30 minutes or until the edges begin to brown. Flip the hardtack pieces halfway through baking to ensure even cooking.
10. Remove the hardtack from the oven and let it cool completely on a wire rack. Once cooled, store it in an airtight container in a cool, dry place.
Check out this video on how to make hardtack (ship biscuits) to learn more.
H/T @townsends
3. Sweet Hardtack Recipe
Indulge in a sweet hardtack recipe, combining classic elements with appealing additives, ensuring a pleasurable taste alongside essential sustenance.
For those who prefer a sweeter take on hardtacks, this recipe offers a tasty twist on the classic survival food.
The added sugar and spices provide a pleasant flavor, making it more enjoyable to eat.
Ingredients:
3 cups all-purpose flour
1 cup granulated sugar
1/2 teaspoon salt
1/2 teaspoon baking powder
1/2 teaspoon ground cinnamon
1/4 teaspoon ground nutmeg
1/4 teaspoon ground allspice
1/2 cup cold unsalted butter, cut into small pieces
1/2 cup cold water
Instructions:
Preheat your oven to 350°F (175°C). Line a baking sheet with parchment paper or a silicone baking mat.
2. In a large mixing bowl, whisk together the flour, sugar, salt, baking powder, cinnamon, nutmeg, and allspice.
3. Add the cold butter pieces to the dry ingredients. Using a pastry cutter or your fingertips, work the butter into the flour mixture until it resembles coarse crumbs.
4. Gradually add the cold water to the flour mixture while stirring with a wooden spoon or spatula. Continue to mix until a dough forms. If the dough is too dry, add a little more water, one tablespoon at a time, until it comes together.
5. On a lightly floured surface, roll out the dough to a thickness of about 1/4 inch (0.6 cm). Use a cookie cutter or a sharp knife to cut the dough into desired shapes and sizes.
6. Transfer the hardtack biscuits to the prepared baking sheet. Use a fork or skewer to poke holes in each biscuit.
7. Bake the sweet hardtack for 20-25 minutes or until the edges are lightly golden. Rotate the baking sheet halfway through the baking time for even baking.
8. Remove the baking sheet from the oven and let the hardtack biscuits cool on the baking sheet for a few minutes. Transfer them to a wire rack to cool completely.
9. Store the sweet hardtack in an airtight container at room temperature. Sweet hardtack should still keep well for several months to a year when stored properly. Enjoy this sweet treat as a tasty alternative to the classic hardtack recipe.
Enhancing Hardtack Palatability
Making hardtack with minimal ingredients is what gives hardtack a long shelf life. However, learning inventive techniques to enhance your hardtack bread can transform it into an enjoyable meal complemented by water crackers and other savory accompaniments.
Here are some ingredients that you can add to your hardtack recipe to make it taste better:
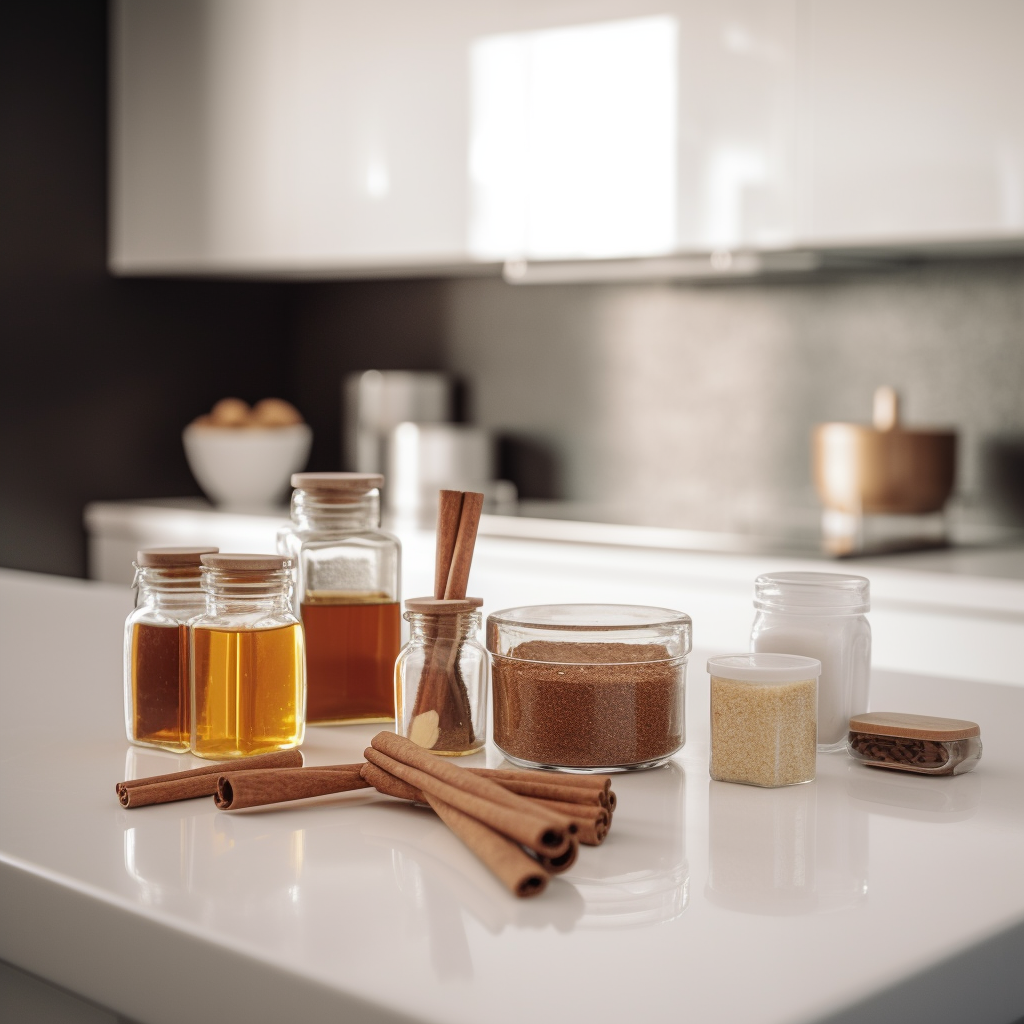
Sugar or honey. A small amount can provide a touch of sweetness to your hardtack. Don’t add too much, as it could reduce the shelf life.
Cinnamon or nutmeg. Spices like cinnamon and nutmeg can add a pleasant aroma and flavor to your hardtack. Use them sparingly to avoid overpowering the taste.
Dried fruits. Chopped raisins, cranberries, or apricots can be added to the dough, giving the hardtack a fruity taste and some added texture.
Nuts and seeds. Almonds, walnuts, sunflower seeds, or flaxseeds can provide extra flavor and texture. Use only unsalted nuts and seeds to maintain the hardtack’s longevity.
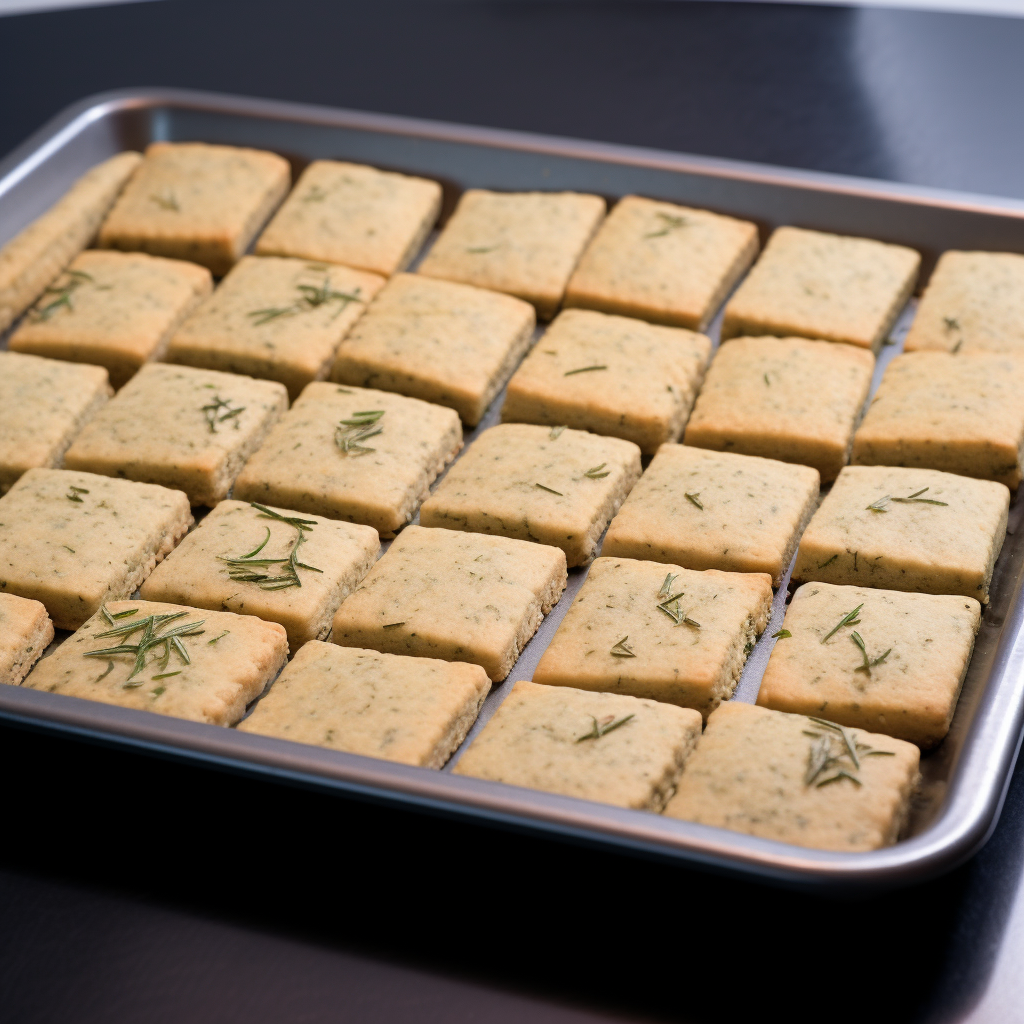
Herbs. Dried herbs such as rosemary, thyme, or oregano can give your hardtack a savory twist.
Nutritional Value Of Hardtack
As simple as hardtack may be, it’s crucial to understand its contributions to food energy, protein, and fiber, vital for maintaining energy levels and overall health. Here’s a breakdown of the nutrients found in our traditional, modern, and sweet hardtack recipes:
Traditional Hardtack
Modern Hardtack
Sweet Hardtack
Calories
100
140
150
Carbs
21 g
23 g
25 g
Protein
3 g
4 g
3 g
Fat
0.5 g
6 g
6 g
Fiber
1 g
2 g
1 g
Sugar
0 g
2 g
8 g
Sodium
25 mg
50 mg
50 mg
Potassium
30 mg
40 mg
40 mg
Iron
1 mg
1 mg
1 mg
Calcium
10 mg
20 mg
20 mg
Vitamin A
0 IU
25 IU
25 IU
Vitamin C
0 mg
0 mg
0 mg
*Note that these values are approximate. They also vary depending on the specific ingredients and recipes used.
5 Different Ways To Eat And Enjoy Hardtack
Here are five creative methods to savor hardtack, incorporating it into diverse meals, from pairing it with saltine crackers to more elaborate dishes, ensuring a satisfying dining experience.
Soak it in liquid. Hardtack can be extremely hard and difficult to chew. To soften it, soak it in water, milk, coffee, tea, or soup. Allow it to sit for a few minutes until it reaches your desired consistency.
2. Fry it. Frying soaked hardtack in a little oil or butter can add flavor and improve its texture. Fry each side until golden brown, and serve it as a side dish or a quick snack.
3. Crumble it into dishes. Hardtack can be crumbled into stews, soups, or chowders, adding bulk and carbohydrates to the meal.
4. Use as a base for toppings. Spread softened hardtack with butter, jam, peanut butter, or cheese to enhance its taste.
5. Sweeten it. Sprinkle sugar or drizzle honey, maple syrup, or molasses on softened hardtack to create a simple dessert.
*Reminder: Hardtack is meant to be a survival food, so it may not be as delicious as other types of bread. But with some creativity, you can make it more enjoyable to eat.
Tips For Storing Hardtack For Long-Term Storage
Hardtack has a long 25-year shelf life but it’s important to store it for long-term use, safeguarding its quality and nutritional value, crucial for a reliable emergency food supply.
To ensure your hardtack stays fresh and safe to eat for as long as possible, follow these tips:
Keep it dry. Ensure that the storage area is dry and free of humidity. Store hardtack in airtight containers, vacuum-sealed bags, or ziplock bags to keep moisture out.
Store in a cool, dark place. Store it in places such as a pantry, cupboard, or cellar.
Protect from pests. Use pest-proof storage containers, like metal or heavy-duty plastic, to prevent any infestations.
Rotate your stock. If you have a large supply of hardtack, practice the “first in, first out” method. This means consuming the oldest hardtack first and adding new batches to the back of your storage area.
Check for spoilage. Although hardtack has a long shelf life, it’s essential to periodically check for signs of spoilage. If you find any spoiled hardtack, discard it immediately.
Detecting Spoiled Hardtack
You must be adept at discerning the signs of spoiled hardtack, ensuring your stored supply remains safe, edible, and nutrient-rich. Here’s how to know your hardtack is unsafe to consume:
Mold. Mold can appear as fuzzy spots or discoloration in various colors, such as green, white, or black.
Unpleasant odor. A rotten or sour smell is another sign of spoilage. Fresh hardtack should have a neutral or slightly flour-like aroma.
Soft or crumbly texture. Fresh hardtack should be very hard and dense. If your hardtack has become soft, crumbly, or moist, it’s likely that moisture has penetrated the hardtack biscuit. If this happens, discard it immediately.
Discoloration. Look for any unusual color changes or dark spots on the surface of the hardtack. This could indicate mold growth or other forms of spoilage.
Insect infestation. If you find small holes or signs of insects in your hardtack or its storage container, throw away the biscuits.
Maintain a fresh stock of hardtack by being vigilant and checking for signs of spoilage. Always discard any that looks off as it can potentially be harmful to your health.
Store-Bought Hardtack
For convenience, store-bought hardtack is available, providing the same long-lasting benefits without the need for home preparation. You can buy ready-made hardtack in some stores or online. These store-bought versions have the same qualities as the homemade version.
They’re usually available in vacuum-sealed packages to ensure freshness and can be a practical addition to your emergency food supply or for outdoor activities.
They are generally more uniform in size, shape, and taste than homemade hardtack. Some are fortified with vitamins and minerals to enhance their nutritional value.
However, be sure to check the expiration date to make sure you’re getting the freshest batch.
And remember, just because it’s store-bought doesn’t mean you can’t get creative with it. Spice it up, break it down, make it your own!
Where Can I Buy Hardtack?
You can buy hardtack from both online and in physical stores. Here are some options to consider:
Remember to read the product descriptions and reviews to ensure you are purchasing the type of hardtack you want.
However, you can always make your own hardtack at home using the recipes provided in this article.
FAQs About How To Make Hardtack
How long will hardtack last?
Traditional Hardtack can last for 25 years or longer if stored correctly. Keep it in an airtight container in a cool, dark, and dry place to ensure its longevity.
How thick should hardtack be?
Hardtack should be around 1/4 to 1/2 inch thick. This thickness allows it to dry out thoroughly during baking, ensuring a long shelf life.
Does hardtack have any nutritional value?
Hardtack is primarily a source of carbohydrates, with some protein and minimal fat. But it lacks essential vitamins and minerals, so it’s best to eat it with other nutrient-dense foods.
Why doesn’t hardtack go bad?
Hardtack doesn’t spoil quickly because it has minimal moisture content. Bacteria and mold need moisture to grow, so the dry nature of hardtack prevents spoilage.
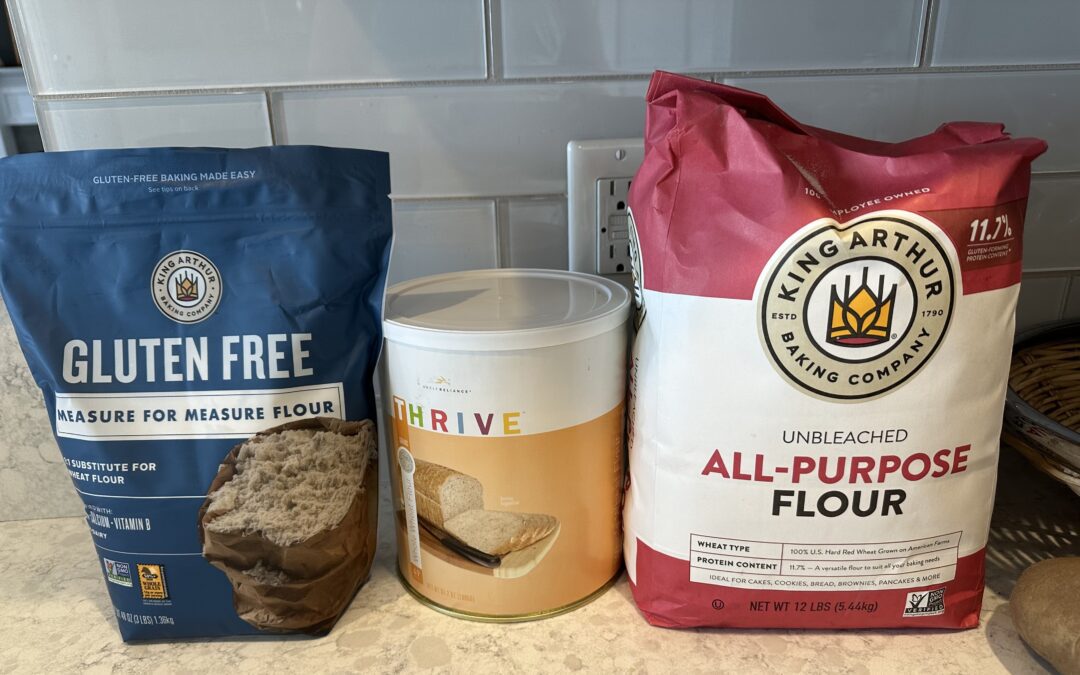
How To Make Hardtack gluten free?
Hardtack can be made gluten free by easily swapping regular flour for a gluten free option, such as almond, coconut or Bob’s Red Mill Gluten Free flour.
Can dogs eat hardtack?
Yes, dogs can eat hardtack biscuits. It is actually considered an early form of dog food, similar to a dog biscuit.
Wrap Up on How To Make Hardtack
Hardtack is a versatile and long-lasting food for long journeys and emergency situations.
Experiment with different recipes and serving suggestions to create an enjoyable hardtack survival food you and your family will enjoy.
When eating, always balance your consumption with other nutrient-rich foods for a well-rounded diet.
How long will flour last in sealed containers depends on various factors, including the type of flour (be it wheat, white or gluten free), storage methods, and environmental conditions.
Flour is a vital ingredient in baking, and has several varieties, each with its distinct shelf life. In a sealed container, flour can last for a considerable amount of time. But that depends on the type of flour and storage conditions.
In this article, we’ll explore flour’s shelf life, its types, and the best practices for its storage. So read on to learn how to store flour long term and get the most out of your supply!
Different flour types, like whole wheat, all-purpose, and bread flour, each come with unique shelf lives. For instance, whole wheat flour, rich in bran and germ, tends to have a shorter shelf life than its refined counterparts due to its natural oils.
Whether you have wheat, white, gluten free or other types of flour the shelf lives will vary depending on how they are stored and the containers being used.
Each has its specific shelf life when stored in a sealed container and in different conditions. This distinction is crucial to ensure the quality of your creations.
Airtight containers stand out as one of the most effective means for extending the longevity of flour. Properly utilized, they can protect flour from moisture and contaminants, key culprits in reducing its freshness. By combining this with a few other strategies, you can extend the life of your flour considerably.
Here are some effective storage techniques:
Use Airtight Containers
If you want to prolong the shelf life of your flour, using airtight containers is a must. The seal inhibits moisture, one of flour’s primary enemies, from entering.
Not only do they protect against moisture and air, but they also safeguard the flour from external contaminants and pests. Glass or high-quality plastic containers with tight-sealing lids are preferred choices.
You can also vacuum seal to preserve flour, as it removes air from the storage bag, minimizing the risk of spoilage and extending the flour’s shelf life.
Transferring flour to these containers allows for easier access and helps keep your pantry organized. Also, label containers with the flour type and date of purchase for easy reference.
Store In A Cool And Dry Place
Storing flour in a cool, dry, and dark environment helps extend its shelf life because temperature plays a significant role in determining the flour’s shelf life. To maintain freshness, keep an ideal storage temperature of around 60-70°F (15-21°C).
Warm and damp environments accelerate flour degradation, so keeping it away from sources of heat and moisture is crucial. Pantries and cupboards are typically ideal locations.
If you live in a particularly hot or humid environment, consider storing flour in the refrigerator or freezer in a sealed container to prolong its shelf life.
Keep Away From Strong-Smelling Items
Flour is porous and can absorb odors, so keep it away from strong-smelling items like spices and other aromatic ingredients that can alter its flavor.
It’s best to store flour in a separate, designated area or using airtight containers with odor-blocking capabilities can help prevent cross-contamination of smells. This will ensure your baked goods maintain their intended flavor profile.
Regularly Check For Freshness
Regular checks for freshness involve searching for bugs or mold on your flour. This indicates that it has reached the end of its life. Also, as flour ages, its quality decreases, and it can develop off-odors or become infested with pests like pantry moths or weevils.
Even with the best storage practices, external factors can affect the flour’s state. By periodically assessing its color, smell, and texture, you can identify any degradation signs early on.
If you find any indications of spoilage, discard the flour immediately to prevent further contamination.
How To Store Flour To Prevent Bugs
To keep flour free from bugs, especially the dreaded pantry moths and weevils, ensure it’s stored in sealed environments. Mylar bags, a type of resealable bag, offer a protective layer against these common pests. While the quality of flour can degrade over time due to exposure to air and moisture, a well-sealed container can keep it bug-free and usable for up to a year.
Always ensure cleanliness and use specific storage techniques to keep these pests at bay. Remember, prevention is always better than cure, especially with food items. Here are some ways to avoid bug infestations:
Freeze flour for 48 hours before storing. This kills any eggs or larvae that may be present.
Use airtight containers. Sealed containers prevent insects from entering and infesting your flour.
Store in a clean, cool, and dry area. Proper storage conditions prevent flour from attracting pests.
How To Freeze Flour For Extended Storage
You can extend the shelf life of your flour by freezing it because at lower temperatures, the natural oils are less likely to spoil. It’s crucial, however, to pack flour in containers like Mylar bags that prevent moisture intrusion during this process. This method not only keeps it fresh but also eliminates the possibility of bug infestations.
Generally, frozen flour will last for 2 years, but it depends on the type of flour and if kept in ideal conditions. To freeze flour, place the flour in an airtight, freezer-safe container or a sealed plastic bag before storing it in the freezer. This method prevents the flour from absorbing moisture and odors.
Signs Of Expired Flour
Utilizing expired flour in your recipes can lead to subpar dishes and potential health concerns. Flour, especially when it becomes a breeding ground for mold or pests, can introduce unwanted contaminants to your meals.
Knowing the signs of expired flour is vital to ensure your baked goods turn out perfectly every time. From a change in aroma to the appearance of mold, there are several indicators to watch out for:
Unusual Odor
Fresh flour should have a neutral scent, and any deviations from this can indicate spoilage. This smell often arises from the breakdown of natural oils.
If your flour has a sharp, sour, or musty odor, that’s a clear sign it’s past its prime. Trust your nose – if it doesn’t smell right, it’s best to err on the side of caution.
Remember, your baked goods will carry the taste and smell of the flour you use, which means an off-putting smell equals a no-go!
Changes in Color or Texture
Any changes in color or texture are signs that often indicate that the flour has been compromised by moisture. An off-white hue or a clumpy consistency can be warning signs that your flour is past its prime.
While some flours naturally have a darker or coarser texture, if you notice a marked change from the norm, it’s probably time to toss it. For instance, whole grain flours may become oily or clumpy, while white flour might appear yellowish.
Mold Growth
Mold spores can thrive in flour that has been exposed to moisture or not stored properly so, any visible mold growth is a definite sign of spoilage. It indicates an unsafe level of moisture and potential fungal contamination.
Consuming moldy flour can pose health risks, so it’s essential to discard it immediately.
Unusual Taste
Your taste buds can identify when the flour has lost its original characteristics so, any unusual taste should be a warning sign. It’s always a good idea to taste a small amount before using it in large quantities for baking.
And even if flour appears fine, an unusual taste can be a giveaway of its compromised quality. If your baked goods start to taste odd or bitter, the flour you use might be the culprit.
Presence of Bugs
The presence of bugs signifies contamination and these pests are often attracted to improperly stored flour.
Discovering bugs in your flour is a clear sign of contamination. Not only does it indicate improper storage, but it also means that the flour should no longer be used for consumption.
Pantry pests, such as flour beetles or weevils, are a common problem in improperly stored flour. If you see bugs in your flour, it’s best to throw it away immediately to avoid a larger infestation.
Why Does Flour Go Bad?
The longevity of flour in a sealed container depends on several factors, including the type of flour, storage conditions, and exposure to moisture and air.
As we dive into these aspects, you’ll gain a deeper understanding of how to maximize the shelf life of this pantry staple.
Natural Oils
The natural oils present in flour speed up the spoilage process. These oils are particularly prevalent in whole-grain and nut varieties.
These can oxidize over time and become rancid. This process manifests as an unpleasant smell and taste, indicating that the flour has gone bad.
Whole wheat and almond flours are particularly susceptible due to their higher oil content. Regularly checking your flour for these signs can help you avoid any unpleasant surprises during your baking activities.
Pests
Pests, such as weevils and mites, contribute to spoilage. They can infiltrate even the most secure packaging if not stored correctly.
Unfortunately, even well-stored flour can become a target for pests like weevils and beetles. They might look small, but these tiny critters can wreak havoc on your flour, leaving you with a contaminated mess.
These tiny insects are attracted to flour and can quickly contaminate a supply if not caught in time. So regular inspection of your flour supply can help prevent a full-blown infestation.
Moisture
Moisture is another key player in flour spoilage. High humidity levels can dramatically shorten its shelf life. When flour comes into contact with water, it creates the perfect environment for mold growth.
And often, this mold is not apparent until after the flour has been used. Always store your flour in a dry place and ensure it’s sealed properly to minimize moisture exposure.
Temperature
Inconsistent temperatures can also accelerate flour spoilage. Flour maintains its freshness best when stored in a stable, cool environment.
When subjected to inconsistent temperatures, it can go bad rapidly, leaving you with a useless batch. That’s why finding a suitable and stable storage area for your flour is crucial.
What Happens If You Use Expired Flour?
Using expired flour may not yield the same results as fresh flour in your recipes, and it can pose some food safety concerns.
Over time, flour can harbor bacteria or develop mold if it has been exposed to moisture. Additionally, its quality deteriorates, which can affect the texture and flavor of your baked goods.
FAQs About How Long Will Flour LastIn Sealed Containers
Can you use flour two years out of date?
While using flour two years out of date may not be harmful, its quality, taste, and texture could be compromised. So don’t use flour that’s out of date, and use fresh ones for the best results.
How do you store flour for years?
To store flour for years, keep it in an airtight, freezer-safe container or a sealed plastic bag and place it in the freezer.
Does flour expire if unopened?
Flour does have a shelf life, even if unopened. However, the expiration date will depend on the type of flour and storage conditions. You should also check the label to see how long you can store your flour.
How do you stockpile flour?
To stockpile flour, store it in airtight containers, keep it in a cool, dry, and dark place, and rotate your stock by using the oldest flour first. You can also freeze flour for long-term storage.
Is it safe to store flour in a plastic container?
Yes, it is safe to store flour in a plastic container as long as it is airtight and food-grade. Make sure the container is clean and dry before storing the flour.
What should I do if my flour gets damp?
If your flour becomes damp, you can dry it out very easily by spreading it out on a baking sheet and heating it for 15 -20 minutes at 200F. You need to keep an eye on it so you don’t accidentally cook the damp flour.
You just want to evaporate the water. This can also be done by leaving it spread out in a dry, warm space that has good ventilation.
Does Gluten Free Flour Last Longer Than Regular Flour?
No, gluten free flour does not typically last longer than regular flour because most gluten free flours are made from nuts that contain oils that can oxidize and go rancid more quickly.
Examples of Gluten Free Flours: almond, buckwheat, cassava, tapioca, coconut, corn, arrowroot, and rice flours.
Key Takeaways: How Long Will Flour Last in Sealed Containers?
Flour’s lifespan depends on various factors, from its type to storage methods. Sealing flour can significantly extend its longevity, keeping it fresh and bug-free.
But for long-term storage, consider transferring flour to an airtight container and freezing it.
For optimal shelf life, use airtight containers and store in a cool, dry location. Watch for signs of expiration such as unusual odors, mold growth, and bugs.
Ultimately, the state of your flour directly impacts the quality of your baking. By being attentive to these elements, you ensure the best results in your culinary ventures.
Follow our storage guidelines to make the most of this essential pantry staple.
Pro Tip
Properly storing flour for extended periods of time can guarantee a readily available supply of essential ingredients in case of a significant crisis. Flour serves a versatile purpose beyond just delectable desserts, it is a valuable resource for baking bread, enhancing soups, and even creating play-doh.
My son and I share a passion for cooking; it’s not only become his hobby but also a cherished bonding activity for us. Ensuring our flour is stored correctly is crucial, providing both nourishment and a sense of comfort during tough times. It’s essential to prevent the flour from spoiling or attracting pests with appropriate storage.
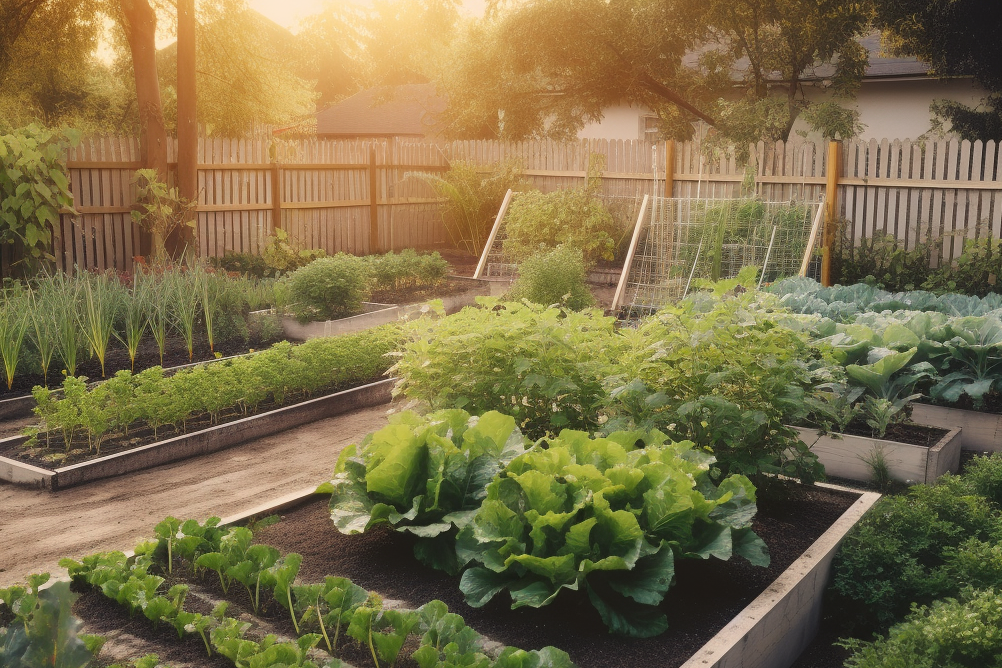
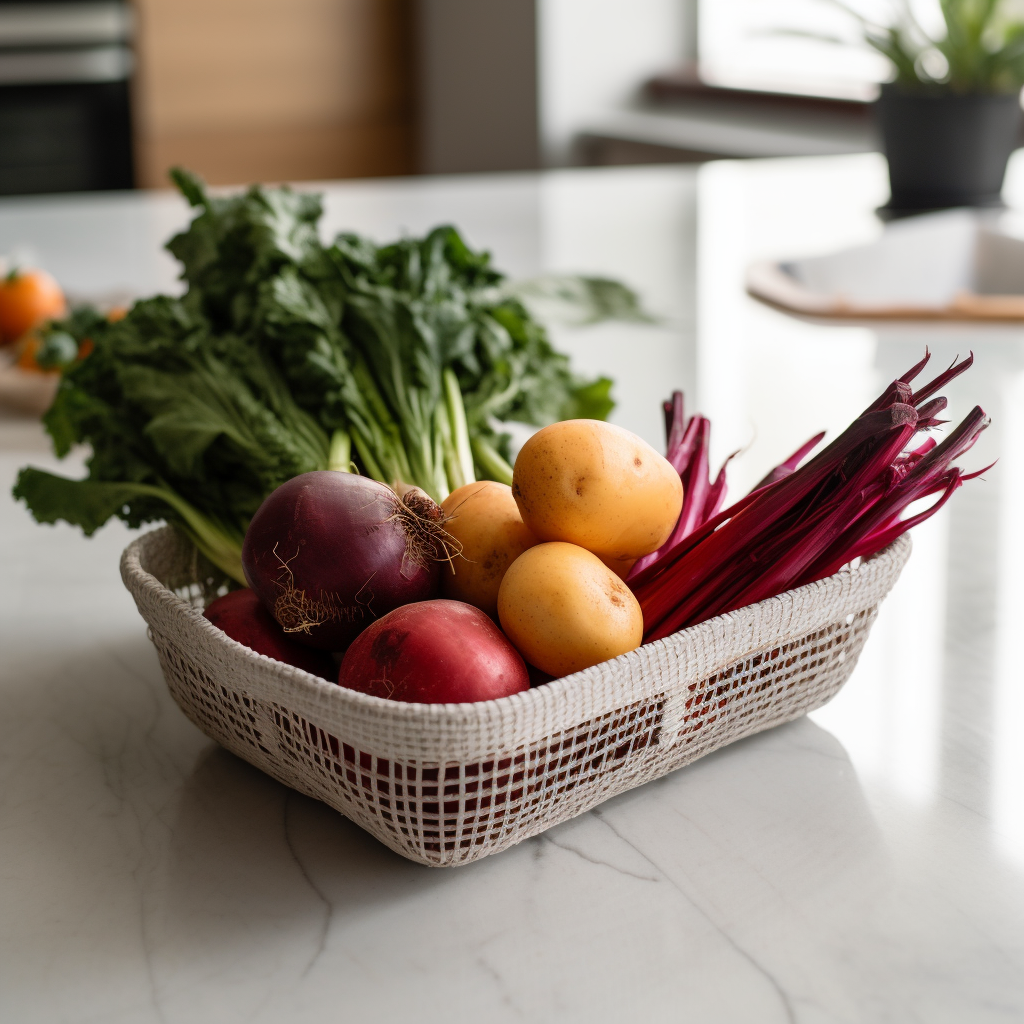
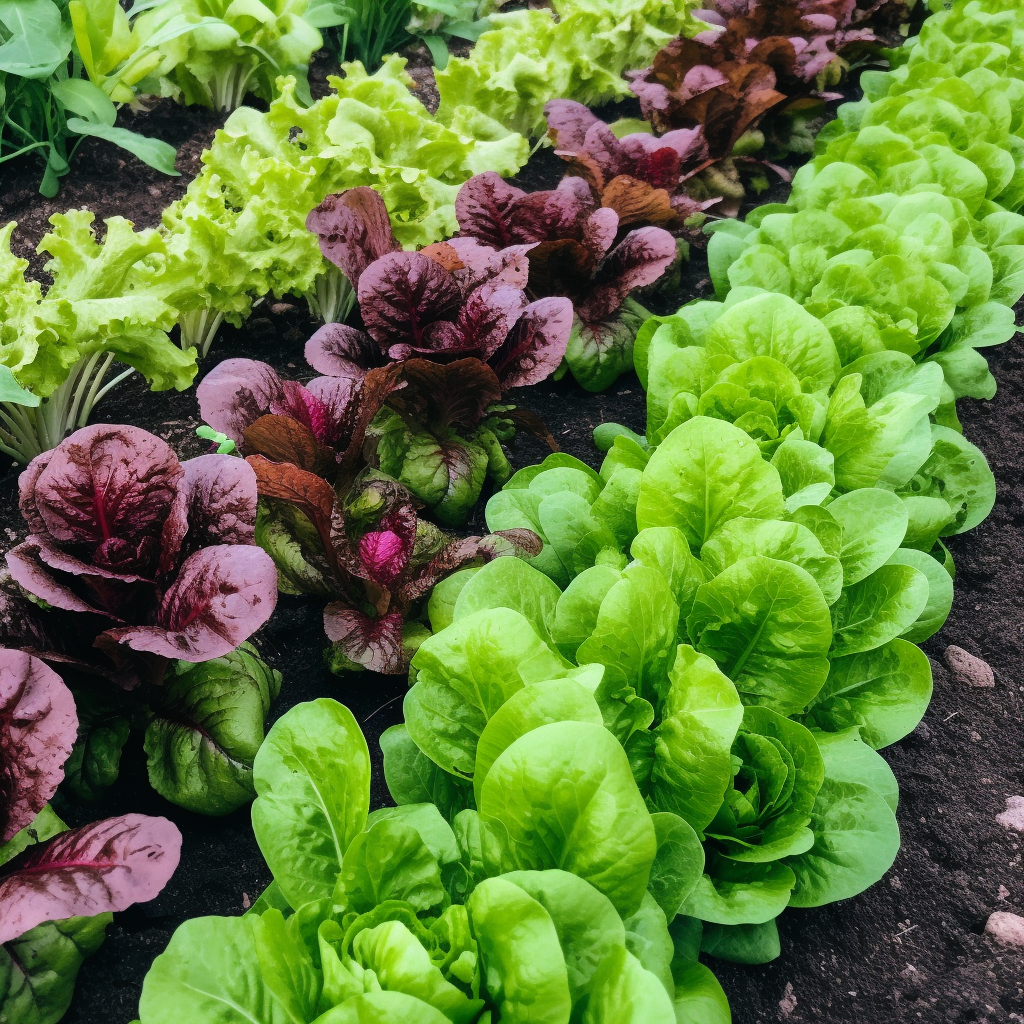
Have you ever wondered what are the best survival crops to plant in your garden in order to create long-lasting food security. Cultivating these staple foods not only enhances self-sufficiency but also ensures robust health.
It’s one way to secure your food supply by transforming your backyard garden into a survival grocery store — filled with the best survival crops that could keep you and your loved ones nourished, even in the toughest of times.
It sounds like a task, I know, but believe me, it’s easier than you think. It’s about making smart choices, focusing on nutritious crops that are easy to grow and capable of storing for longer periods.
These are the 31 best crops to grow in your home garden to create food security.
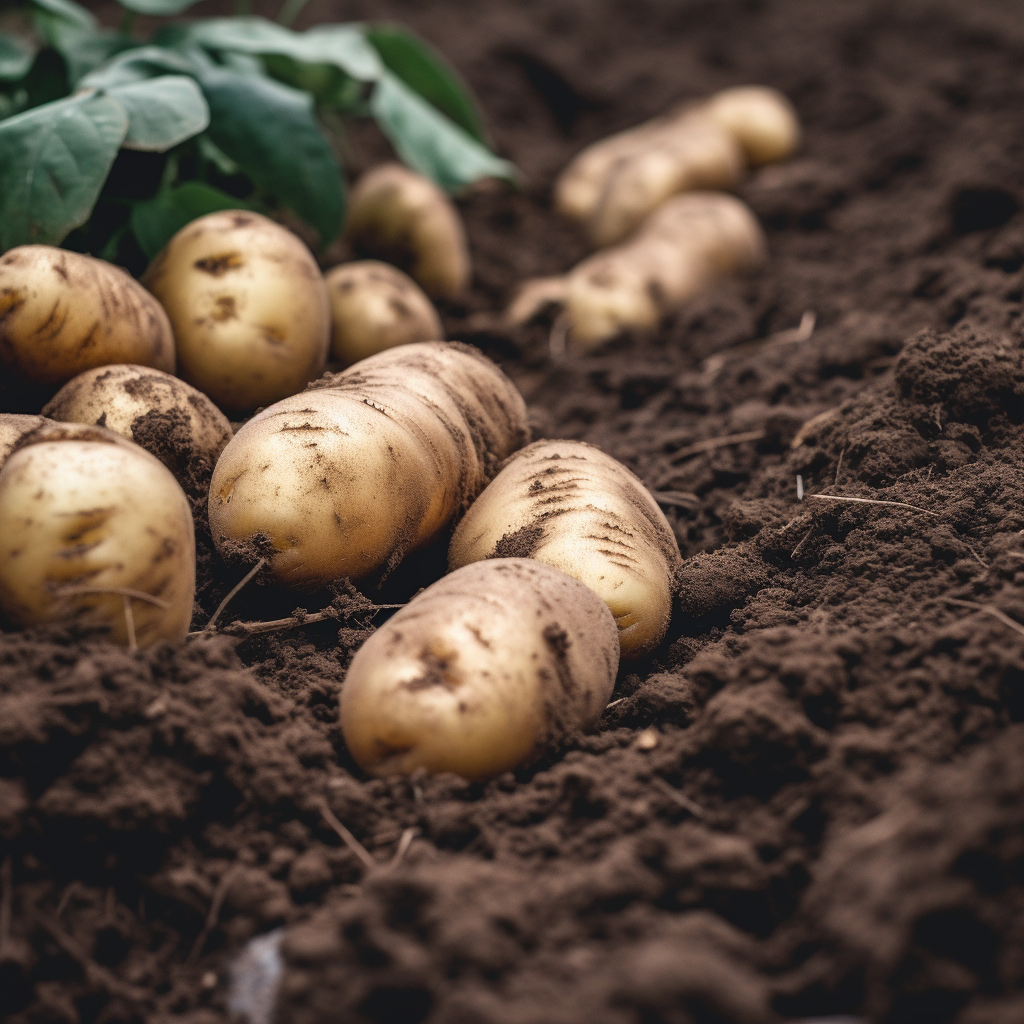
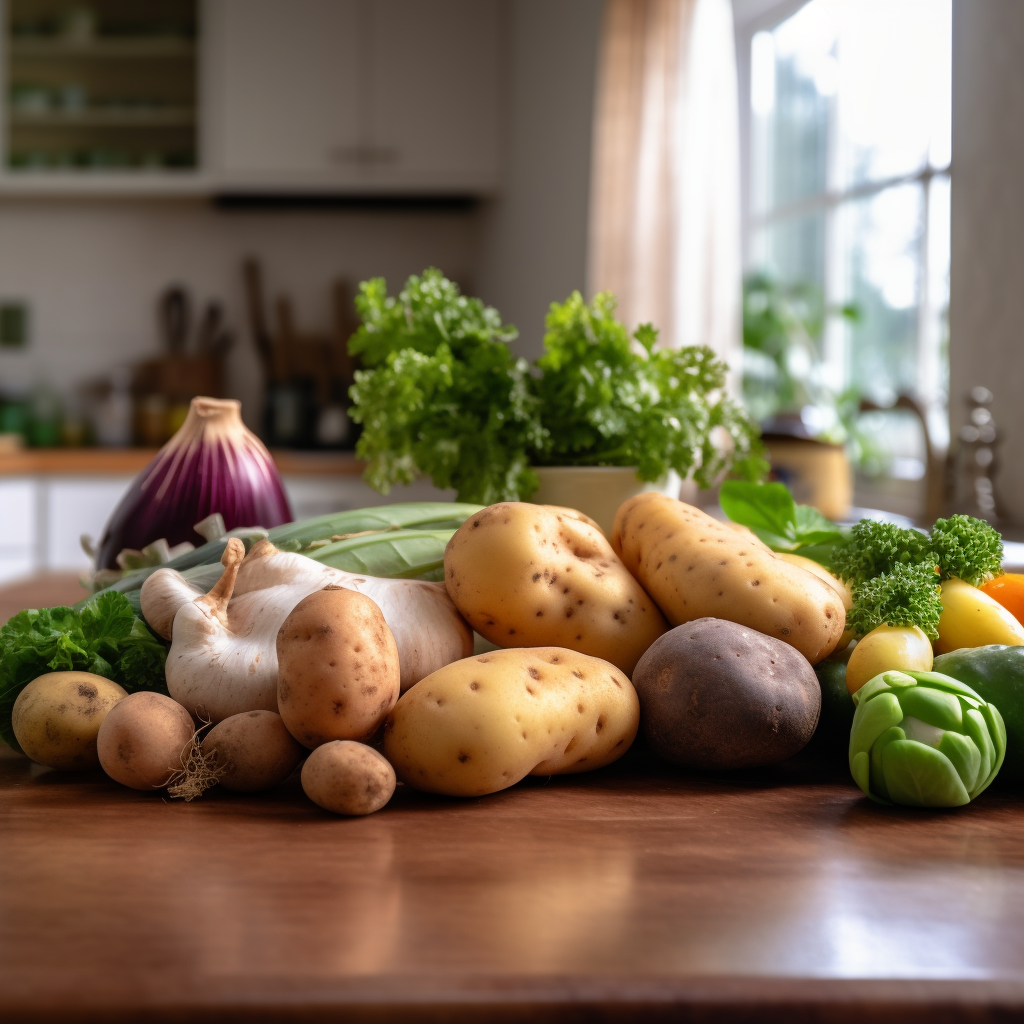
1. Potatoes
Potatoes offer high-calorie sustenance and grow in diverse climates. These all-time favorite are stacked with vitamin C, which is great for the immune system, and they also contain fiber and potassium.
Cut a seed potato into pieces, each with an ‘eye’, and plant them.
Then all you need is well-drained soil and plenty of sunlight. In a few months, you’ll be harvesting them.
You can store potatoes for months in a cool, dark place. One thing, though –- don’t store them near apples. Apples give off a gas that can make your potatoes sprout faster.
2. Beans
Beans are protein-rich and require minimal care. Whether we’re talking bush beans, pole beans, or fava beans, they’re all jam-packed with protein, vitamin B, and fiber.
They love soaking up the sun in a warm climate, and late spring is their prime time to get planted and start sprouting.
Plant beans about an inch deep, and in a few weeks, you’ll see them sprout. They’re easy to store, too, just let them dry on the vine, and they can last for years.
They’re perfect for soups, stews, or even salads. Plus, as a bonus, they improve soil fertility by fixing nitrogen — a perfect vegetable for crop rotation.
3. Corn
Corn serves as a versatile crop with various culinary uses. It isn’t just for summer barbecues. It’s a survival crop packed with fiber and antioxidants. It’s a good source of fiber, plus it’s loaded with B vitamins and antioxidants.
It’s a warm-season crop that needs lots of sunlight and fertile, well-drained soil. Plant the seeds about 1 inch deep and 4 inches apart in rows, and in about 60 – 100 days, you’ll be harvesting.
Dry the kernels, and you can store them for years. You can grind them into flour, make cornmeal, or simply cook and eat them.
And here’s a fun fact: Did you know you can also use corn as a companion plant? It provides tall stalks for climbing plants like beans –- even fava beans or bush beans — to grow on. A survival garden dynamic duo right there!
4. Squash
Squash provides abundant yield and long shelf-life. Whether winter squash or summer squash, these versatile veggies pack a nutritional punch. They’re loaded with vitamins A, C, and E and full of antioxidants, making them a real health booster.
Squash is super easy. They love a sunny spot and well-drained soil. And remember, give them some space with mounds to sprawl on. They usually take around 60 – 100 days to grow, depending on the variety.
Storing squash is simple. Winter squash can last for months in a cool, dark place, while summer squash needs to be used up a bit quicker.
Roast them, make soup or even pie, and enjoy their nutritious benefits.
5. Kale
Kale is nutrient-dense and frost-resistant. It is a nutritional powerhouse that’s hardy and can withstand frost and even snow. It grows best in cool weather, in well-drained, fertile soil.
You can start them as seeds indoors and transplant them or directly sow them 1/2 inch deep. It takes about 55 – 75 days to mature, but you can start harvesting leaves as soon as they’re big enough to eat.
Storing kale is straightforward. Just wrap it loosely in a damp paper towel and pop it in the fridge. It’ll last about a week.
Saute it, add it to soups, or make a salad; it’s a versatile green that will keep you healthy.
6. Sweet Potatoes
Sweet potatoes offer complex carbohydrates and adaptability to soil types. These tubers are rich in vitamins A and C, fiber, and potassium and can be stored for weeks. They prefer a warm climate and well-drained, sandy soil.
Plant sweet potato slips (young sweet potato plants) about 12 inches apart, and in about 90 – 170 days, they’re ready to harvest.
Bake them, roast them, or make a stew; their sweet taste will be a comfort in challenging times.
7. Spinach
Spinach grows quickly and is rich in vitamins A, C, and K and a bunch of essential minerals.
It is a nutrient-dense leafy green that’s easy to grow and can thrive in a wide range of climates. It’s also a great source of iron and other essential nutrients.
It prefers cold weather and fertile, well-drained soil so it’s best planted in early spring or late summer for a fall harvest.
Use spinach fresh in salads, steamed, or added to soups and stews.
Plant the seeds 1/2 inch deep and 2 – 3 inches apart. In just 4 – 6 weeks, you can start harvesting.
To store them, just keep them in a plastic bag in the fridge, and they’ll stay fresh for about a week. Use it in salads, saute it, or add it to soups for a nutritional boost.
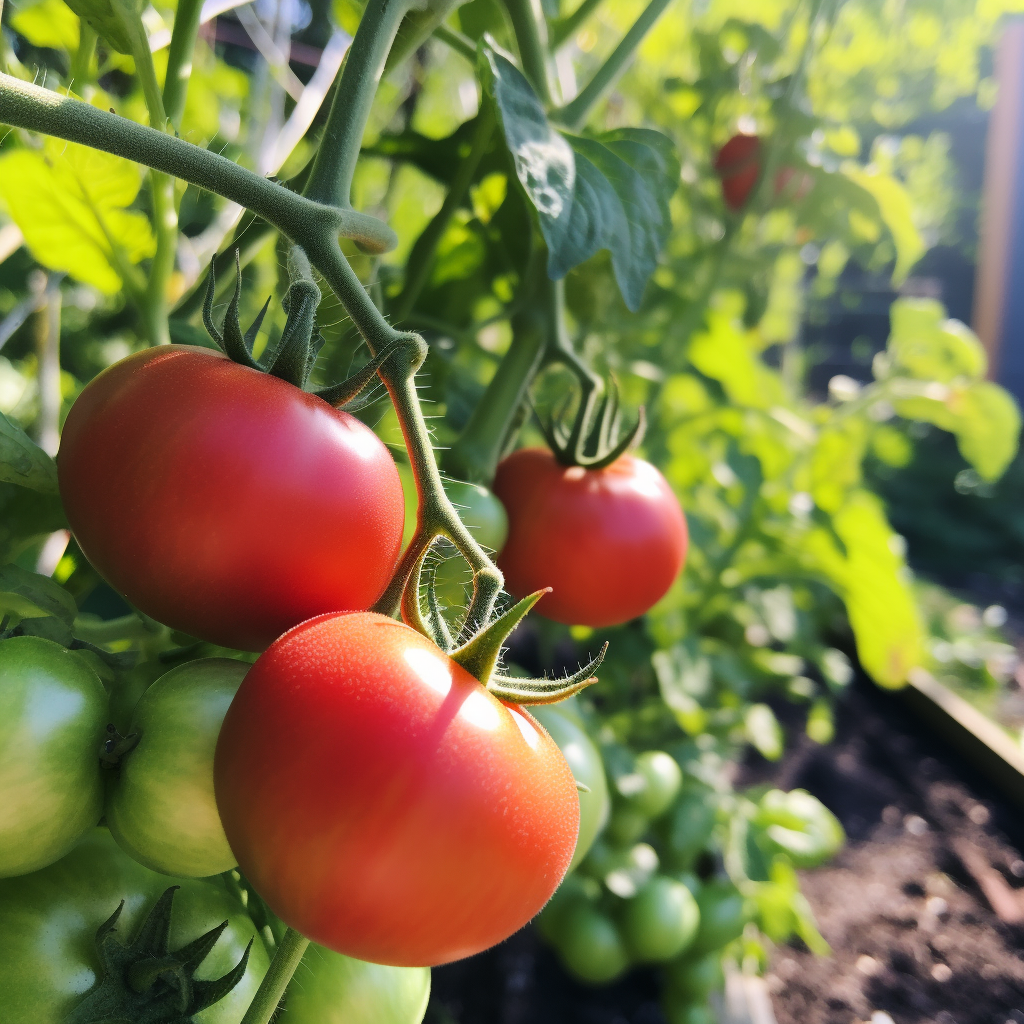
8. Tomatoes
Tomatoes are versatile for cooking and rich in antioxidants. Few things beat the taste of a freshly plucked tomato. They’re packed with vitamins and antioxidants and grow well in most climates, although they prefer warm weather.
Plant them in fertile, well-drained soil and keep them in full sun. From seed to harvest takes about 60 – 80 days.
Store them fresh for a few days, or keep them at room temperature until they’re fully ripe, and they’ll be good for about a week. Use them in salads, sauces, or just eat them fresh.
9. Peppers
Peppers yield high returns and offer a variety of flavors. Both bell and hot peppers can provide essential vitamins and add flavor to your meals. They love warm, well-drained soil and plenty of sunshine. It takes about 60 – 90 days for them to bear fruit.
When it comes to storage, just pop peppers in the fridge, and they’ll stay crisp for a week or two.
Peppers are real culinary chameleons. Use them in stir-fries, stuff them, grill them, or just slice them up for a zingy salad.
10. Cabbage
Cabbage is durable and provides vitamin K. You can store for it long periods and provides many health benefits. Cabbage prefers cooler weather and fertile, well-drained soil.
Plant cabbage seeds 1/2 inch deep and 12 – 24 inches apart. They’re ready to harvest in about 70 – 120 days.
Store them in a cool, humid place, and they can last for months. Use them in salads and soups, or ferment them to make sauerkraut.
11. Carrots
Carrots are easy to grow and beneficial for eyesight. Carrots are nutrient-packed, easy to grow, and can be stored for months. They prefer cool weather and deep, loose soil.
Plant the seeds about 1/4 inch deep and thin the seedlings to about 2 inches apart. In about 2 – 4 months, you’ll be harvesting them.
Store them in a cool, humid place to last for months. Eat them raw, steam them, or use them in soups and stews.
12. Beets
Beets are hardy and support liver health. They are an excellent source of nutrients. Plus, you can eat both the roots and the leaves. They prefer cool weather and well-drained, loose soil.
Plant the seeds 1/2 inch deep and about 1 inch apart, then thin the seedlings to about 3 inches apart. They’re ready to harvest in about 50 – 70 days.
Store the roots in a cool, humid place, and they’ll last for months. Roast them, boil them, or pickle them — they’re versatile and nutritious.
13. Onions
Onions are storage-friendly and have antibacterial properties. They are easy to store and an essential flavor base for many meals. They can grow in a wide range of climates but prefer cooler weather.
Plant them in fertile, well-drained soil. Use sets (small bulbs) for easy planting, and they’ll be ready to harvest in about 3 – 5 months.
Store them in a cool, dry place, and they can last for several months. Use them in almost any savory dish for added flavor.
14. Garlic
Garlic is medicinal and serves as a natural pest deterrent. As one of those “plant it and forget it” perennial plants, garlic loves cooler weather and well-drained soil. This little bulb is loaded with vitamin C, B6, and manganese, and its antioxidant abilities are off the charts.
Plant the cloves about 2 inches deep and 4 inches apart. They’re ready to harvest in about 9 months.
Store them in a cool, dry place, lasting for months. Use them in a variety of dishes to boost both flavor and nutrition.
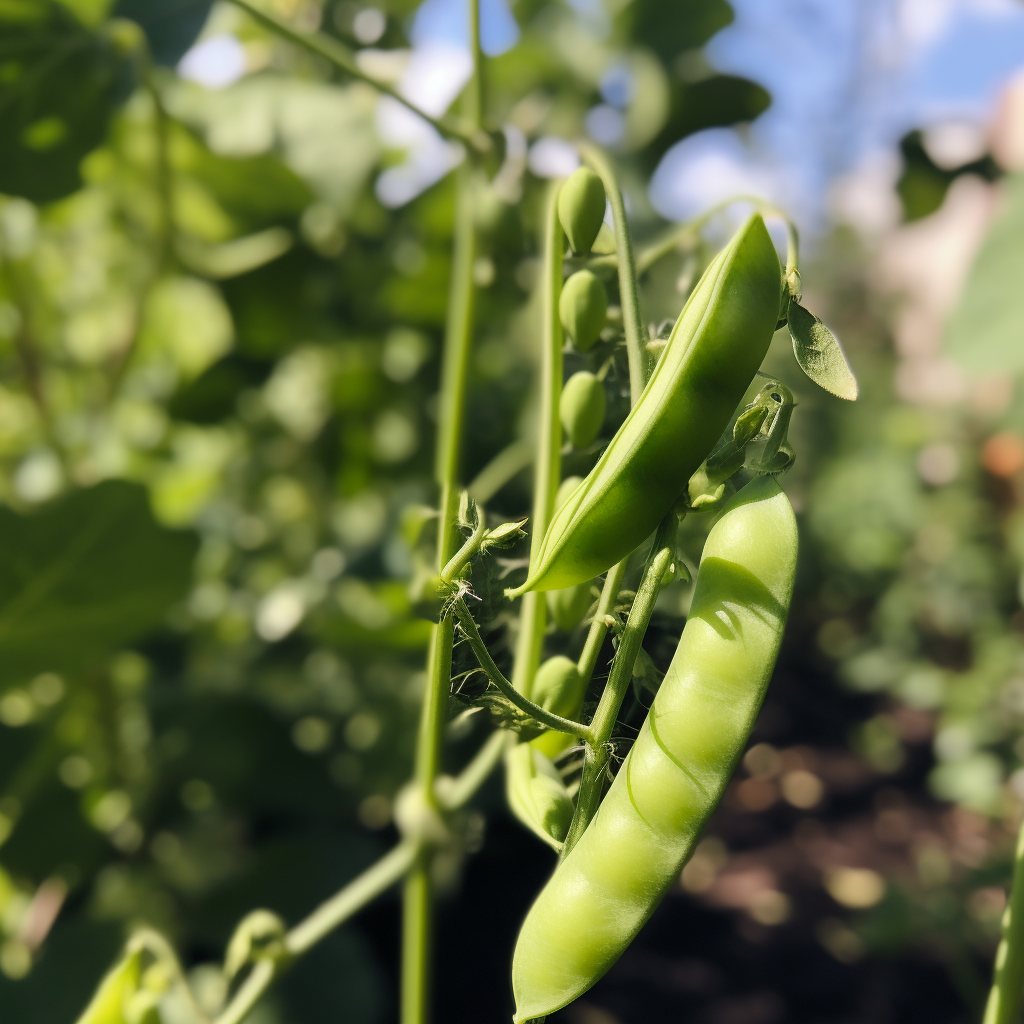
15. Peas
Peas enrich soil and are a fantastic source of protein and fiber.
Peas are a great source of protein, fiber, and vitamins and minerals, including vitamin K and manganese.
They like well-drained soil and can handle a bit of frost.
Plant the seeds about an inch deep and a few inches apart. In about 60 – 70 days, you’ll be harvesting.
Fresh peas can be stored in the fridge for a few days, or you can freeze or dry them for long-term storage.
Eat them fresh, add them to salads, or cook them in soups and stews.
16. Zucchini
Zucchini grows abundantly and offers various culinary applications. This fast-growing vegetable is low in calories but high in essential nutrients. It thrives in warm weather and well-drained, fertile soil.
Plant the seeds about an inch deep and give them plenty of space to grow. You’ll be harvesting them in just 45 – 55 days.
You can store fresh zucchini in the fridge for a couple of weeks or freeze them for long-term storage. Grill, saute or bake them into delicious zucchini bread.
17. Lettuce
Lettuce is quick to harvest and low in calories. It also takes up very little space, making it an ideal survival crop. It prefers cool weather and moist, fertile soil.
Plant the seeds about 1/4 inch deep and a few inches apart. You’ll harvest them in just 30 – 60 days.
Store fresh lettuce in the fridge for a few days. Use it in salads or add it to sandwiches for a fresh, crispy bite.
18. Radishes
Radishes mature quickly and can break compacted soil. Radishes are one of the fastest-growing vegetables, and the roots and the leaves can be eaten.
They love cool weather and well-drained soil. And talk about speedy -– you can harvest them in as little as three weeks! Just plant the seeds about 1/2 inch deep and an inch apart.
Fresh radishes can be stored in the fridge for a few weeks. Eat them raw, add them to salads, or pickle them for a tangy treat.
19. Swiss Chard
Swiss Chard is nutrient-rich and grows well in partial shade. This vegetable is a nutrient-dense leafy green that can tolerate cool and warm weather. It’s a cool-weather crop that enjoys well-drained soil.
Plant the seeds about 1/2 inch deep and a few inches apart. In about 50 – 60 days, you’ll be harvesting them.
Fresh chard can be stored in the fridge for a few days. Saute it, add it to soups, or use it in salads.
20. Cucumbers
Cucumbers are hydrating and suitable for trellising. They are packed with nutrients. They love warm weather and fertile, well-drained soil.
When planting, just pop the seeds about 1 inch under the soil and give them plenty of space to climb. You’ll be enjoying your own crisp, homegrown cucumbers in just 50 – 70 days.
You can store fresh cucumbers in the fridge for a week, or you can pickle them for long-term storage. Eat them fresh, add them to salads, or pickle them for a crunchy snack.
21. Yams
Yams are calorie-dense and store well. They are root vegetables known for their starchy content and versatility in the kitchen. They prefer a tropical climate and well-drained soil, making them ideal for areas with a lot of rainfall.
Yams can be a bit tricky to grow as they require a long growing season (up to 11 months) and have specific temperature needs. Despite this, they’re highly beneficial as a survival crop due to their high caloric content and long storage potential.
You can roast, boil, fry, or mash yams, and they can even be used in baking as a healthier alternative to regular flour.
22. Okra
Okra thrives in heat and is rich in fiber. It has a unique texture and mild flavor and is a favorite in many southern and tropical cuisines. It’s a warm-weather crop that loves the sun and well-drained soil.
Okra can be a bit tricky to start from seed, but once established, the plants are fairly low-maintenance. The pods are best harvested when small and tender, usually about 2 – 3 inches long.
Okra is a good source of vitamins and fiber and can be fried, stewed, or pickled for a tangy treat.
23. Amaranth
Amaranth is drought-resistant and a source of complete protein. It is a lesser-known but super impressive crop. It’s a great source of protein, fiber, and micronutrients like manganese, magnesium, and phosphorus.
It thrives in warm weather and is tolerant of poor soil conditions –- talk about a hardy plant! It takes about 90 – 120 days to mature.
To store amaranth, keep the seeds in a cool, dark place, and they can last for years.
You can cook amaranth leaves like spinach, and you can pop the seeds like popcorn. You can also cook it into cereal or ground it into flour.
24. Melons
Melons offer hydration and are a source of vitamins. Melons, including watermelons, cantaloupes, and honeydews, are a sweet treat that can be grown in your survival garden
They prefer warm weather and plenty of space to spread out, although some smaller varieties can be grown vertically to save space.
They require a bit of care to ensure a good harvest, including regular watering and protection from pests.
But the reward –- sweet, juicy fruit –- is well worth the effort.
25. Berries
Berries are antioxidant-rich and attract beneficial wildlife. Berries, including strawberries, raspberries, and blueberries, are one of the best foods to grow in a garden. They’re packed with vitamins and antioxidants, and they’re also a real treat to eat.
Berries can be a bit challenging to establish as they have specific soil and care requirements, but once they’re established, they can produce fruit for many years.
Berries are great for fresh eating, in desserts, or preserved as jam or jelly.
26. Herbs
Herbs offer medicinal properties and culinary versatility. They are an essential part of any survival garden. They take up little space, are easy to grow, and can add flavor and nutrition to your meals. Some common herbs include basil, rosemary, thyme, and parsley.
Plus, you can grow them in the ground or in containers. And they’re fast growers — you can start harvesting as soon as the plant has enough foliage to maintain growth.
Herbs are great for fresh use in cooking. Plus, many double as medicinal plants, which can be invaluable in a survival situation. Think of chamomile for calming tea or mint for digestion.
Storing herbs is easy. Just dry them out, and they can last for months, even years.
27. Oranges
Oranges provide vitamin C and are long-lasting when stored. They grow best in tropical and subtropical climates, needing plenty of sunlight and well-drained soil.
While growing fruit trees like oranges can take a few years to produce fruit, the wait is worth it, providing fresh, nutritious fruit right from your backyard. They require regular watering and occasional feeding to thrive.
Oranges can be enjoyed fresh, juiced, or even preserved in marmalades.
28. Lemons
Lemons are multi-purpose and rich in vitamin C. Similar to oranges, lemons thrive in warmer climates with plenty of sunlight. They provide a great source of Vitamin C and add a bright, tangy flavor to foods.
Lemons require well-draining soil and regular watering to produce well.
They’re perfect for use in various dishes, from savory to sweet, and the zest can add extra flavor to meals. Furthermore, lemons have numerous health benefits and can be used in natural cleaning solutions.
29. Avocados
Avocados offer healthy fats and grow well in warm climates. They are a source of healthy fats and are extremely versatile in the kitchen. They thrive in warm climates with mild winters and require well-draining soil.
Avocado trees can be finicky and require a fair amount of care, but the yield is worth the effort.
Fresh avocados can be used in salads, made into guacamole, or even used as a healthier substitute for butter in some recipes.
30. Plums
Plums are easy to preserve and high in antioxidants. They are an excellent source of vitamins, minerals, fiber, and antioxidants. They grow well in a variety of climates, but they do prefer well-drained soil and plenty of sunlight.
Plum trees require pruning to maintain shape and encourage better fruit production.
Fresh plums are a sweet treat, but they can also be used in baking, preserved as jam or jelly, or dried into prunes for long-term storage.
31. Broccoli
Broccoli is nutrient-rich and grows well in cooler climates. It is a great source of vitamin C, iron, potassium and fiber. It’s also a good way to add a little more protein to your diet during a survival situation when protein may be scarce.
Plant broccoli seeds 1/4″ to 1/2″ down into the soil leaving 12″-18″ of space between plants so there is plenty of room to grow.
Usually, the seeds will start to sprout in 4-7 days in cool climate. (45-85 F)
Broccoli can be eaten fresh, steamed or sautéed. It is delicious added to soups, stir fry, pasta and rice and makes a great addition to your food supply.
What Makes The Best Survival Crops
The best survival crops offer a balance of essential nutrients, ease of growth, and longevity. When selecting the best crops for your survival garden, there are several key factors to consider.
Nutrient-Dense
Nutrient-dense options fortify health and require less consumption. In a survival situation, every calorie counts. You want crops that pack a lot of calories into a small serving.
Foods that are high in calories can provide the energy needed to perform essential tasks.
Crops like potatoes, beans, and sweet corn are high in calories and can provide the energy you need.
Leafy greens like spinach and kale are packed with essential vitamins and minerals.
Easy To Grow
Easy-to-grow crops minimize the need for intensive care and specialized knowledge. Crops that are easy to grow reduce the need for constant tending. You don’t want to rely on a crop that requires a lot of care or has a high chance of failure. Crops like radishes, zucchini, and peas are relatively low-maintenance and are a good choice, especially for beginner gardeners.
Versatile To Cook
Versatile crops can be prepared in multiple ways, offering culinary variety. The best survival foods can be used in various dishes. This not only prevents “menu fatigue” but also allows you to make the most of the ingredients you have on hand.
Corn, for example, can be used in everything from soups and stews to bread and desserts.
Good Storage Potential
Crops with good storage potential can last through off-seasons, ensuring year-round availability. In many climates, you can’t grow fresh produce year-round. Crops like onions, garlic, and winter squash can be stored for months without refrigeration, providing food in the winter months or during times of scarcity.
Seed-Saving Potential
Crops with seed-saving potential can be replanted, reducing dependence on external sources. Consider whether you can save and successfully germinate seeds from your crops. This allows you to sustain your garden year after year without relying on outside sources for seeds.
Heirloom tomatoes, peppers, and beans are known for their reliable seed-saving potential.
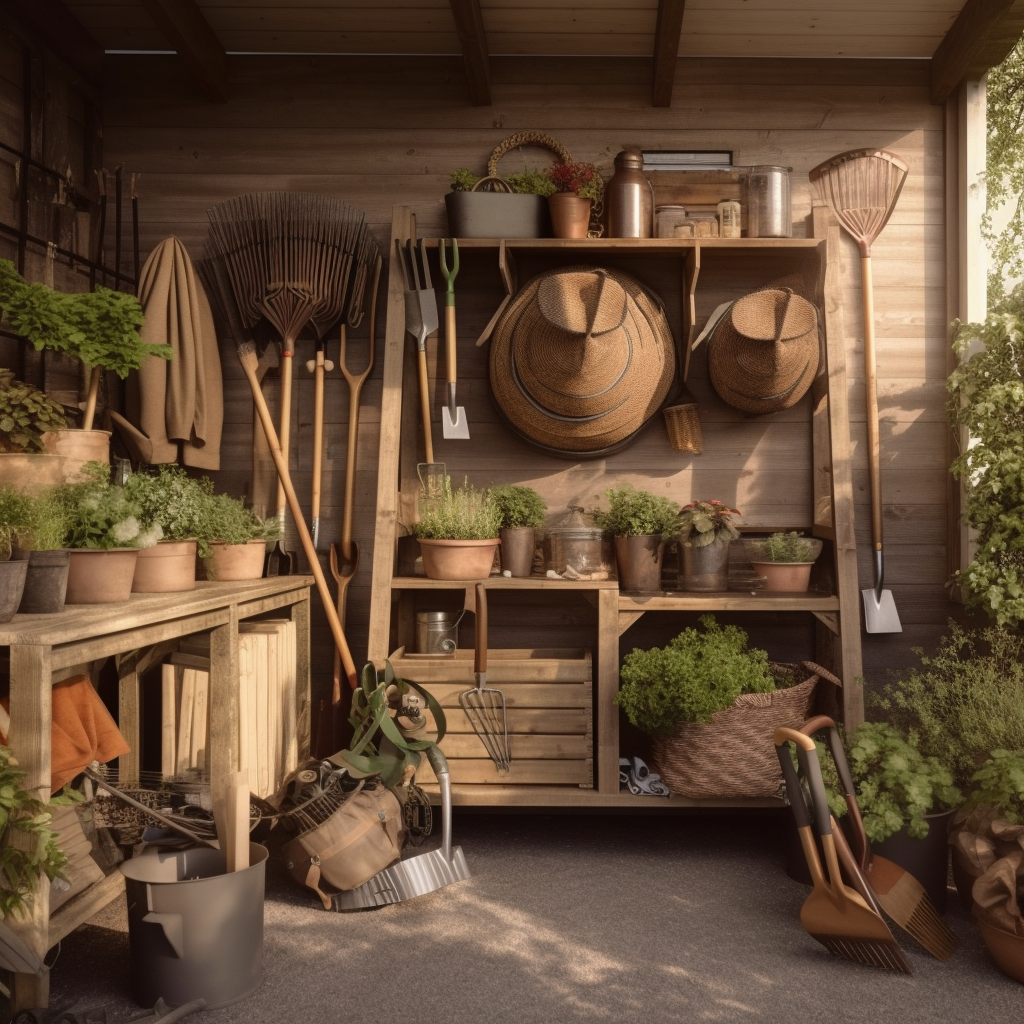
Essential Tools For Your Survival Garden
Essential tools elevate the efficiency and productivity of your survival garden. To ensure your survival garden thrives and gives you the best yield, you’ll need a few essential tools. Here’s a list with a brief rundown of each:
Spades or garden forks help loosen the soil, making it easier for plant roots to penetrate deeper.
Hoes or trowels are perfect for weeding and maintaining the garden. A sharp hoe can cut through weeds, while a trowel is excellent for planting smaller crops and herbs.
Garden rakes are essential for leveling the soil after turning it. A leveled garden will ensure an even distribution of water.
Pruning shears are for keeping your plants in check and removing any dead or diseased branches, pruning shears are a must.
Watering can or garden hose will help you deliver water to your plants. Depending on the size of your garden, a simple watering can may suffice, or a garden hose might be more efficient.
Wheelbarrow is an ideal tool for larger gardens. It’s handy for moving soil, compost, or harvested crops.
Gloves and boots will help protect your hands and feet, especially when dealing with thorny plants or rocky soil.
Remember, your tools are an investment. Good quality tools, well cared for, can last for many growing seasons.
How to Grow, Plant, And Store The Best Survival Crops At Home
Knowing how to grow, plant, and store your crops ensures a perpetual food supply and is crucial for self-sufficiency.
1. Plan Your Survival Garden
Planning your survival garden involves choosing the right crops and mapping out your space. Start by assessing the available space you have.
Remember, you don’t necessarily need a huge backyard –- many crops can be grown in containers on a balcony or even indoors.
Next, consider your climate and soil type. Some crops prefer cool weather, others prefer warm. Some like sandy soil, while others prefer clay. Choose crops well-suited to your conditions for the best chance of success.
Also, think about your dietary needs and preferences. There’s no point in growing a crop you or your family won’t eat.
Finally, draw up a garden plan. This will help you maximize your space and ensure each plant has the room it needs to grow. Remember to account for crop rotation to maintain soil health and prevent the buildup of pests and diseases.
2. Prepare the Soil for Your Survival Garden
Proper soil preparation sets the foundation for crop health and yield. This determines the nutrient density of your crops. Don’t plant anything in poor soil. Remember that good soil is the foundation of a healthy garden. Start by clearing the area of any grass or weeds. Then turn the soil with a shovel or a garden fork, breaking up large clods and removing rocks.
Next, enrich the soil with organic matter. Compost, aged manure, or leaf mold can improve soil fertility, structure, and drainage. These organic materials provide the nutrients your crops need to grow and thrive.
Consider testing your soil to determine its pH and nutrient levels. Many extension services offer soil testing, or you can purchase a do-it-yourself kit.
If your soil is too acidic or alkaline, you can adjust the pH with lime or sulfur. If it lacks certain nutrients, you can add specific fertilizers to address the deficiencies.
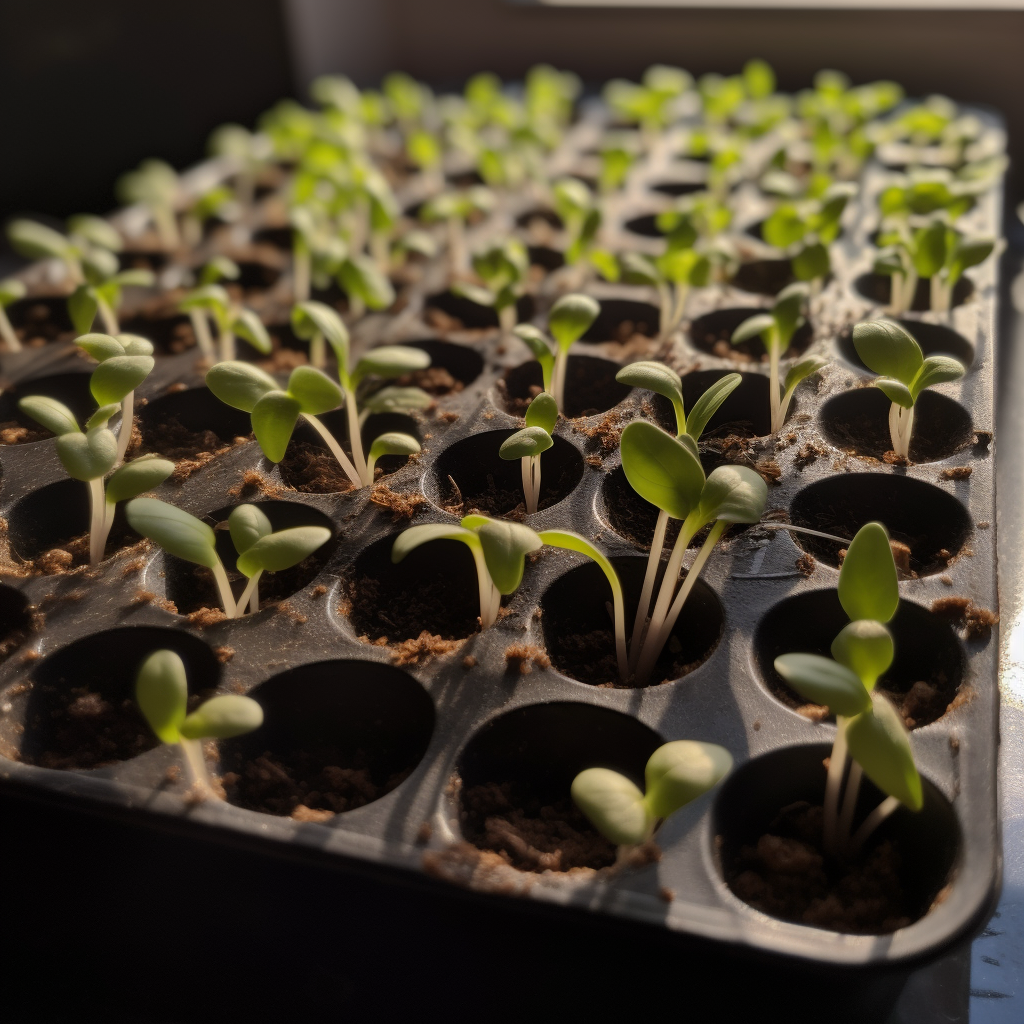
3. Plant Your Survival Crops
Planting the best survival crops at the right time and depth maximizes their potential. Once your soil is prepared, you’re ready to plant. Follow your garden plan and the specific planting instructions for each crop.
Some crops are best started from seeds directly sown in the garden, while others should be started indoors or bought as seedlings.
Remember to water your crops regularly, especially during dry periods. Most vegetables prefer a consistent supply of moisture.
However, be careful not to overwater, as this can lead to root rot and other problems.
4. Maintain Your Survival Garden
Regular maintenance includes watering, fertilizing, and warding off pests. A survival garden is not a set-it-and-forget-it project. You need to give it consistent care and attention. Regular watering, weeding, and pest control are all necessary to maintain a healthy garden.
As your crops grow, they may need additional support. Tomatoes, peas, and cucumbers, for instance, will benefit from trellises or stakes to support their growth and keep the fruit off the ground.
But don’t worry, the rewards — fresh, nutritious food — are well worth the effort.
5. Harvest Your Survival Crops
Harvesting at peak ripeness ensures optimal flavor and nutrient retention. Harvesting your crops is one of the most rewarding parts of survival gardening. It’s a tangible result of your hard work, bringing you one step closer to food independence.
Each crop has its signs of ripeness. Tomatoes, for instance, are best picked when fully colored and slightly soft to the touch.
Root crops like carrots and beets can be harvested when they reach a usable size. Leafy greens can be harvested a few leaves at a time, allowing the plant to continue growing.
Remember to be gentle when harvesting your crops. Rough handling can cause bruising or damage that reduces the storage life of your produce. Also, use a sharp knife or pruner for clean cuts, and handle the produce carefully.
6. Store Your Survival Crops
Proper storage techniques extend the shelf life of your crops. Preservation methods like canning and drying allow for long-term storage.Once you’ve harvested your crops, proper storage is crucial to extend their shelf life and ensure you have enough food supply.
Many root crops like potatoes, onions, and garlic can be stored in a cool, dark, and well-ventilated place for several months.
Crops like tomatoes and peppers should be eaten fresh or can be preserved by canning, drying, or freezing. Certain crops, like beans and corn, can be dried for long-term storage.
Drying is a simple and effective way to preserve food, and it doesn’t require any special equipment or energy input.
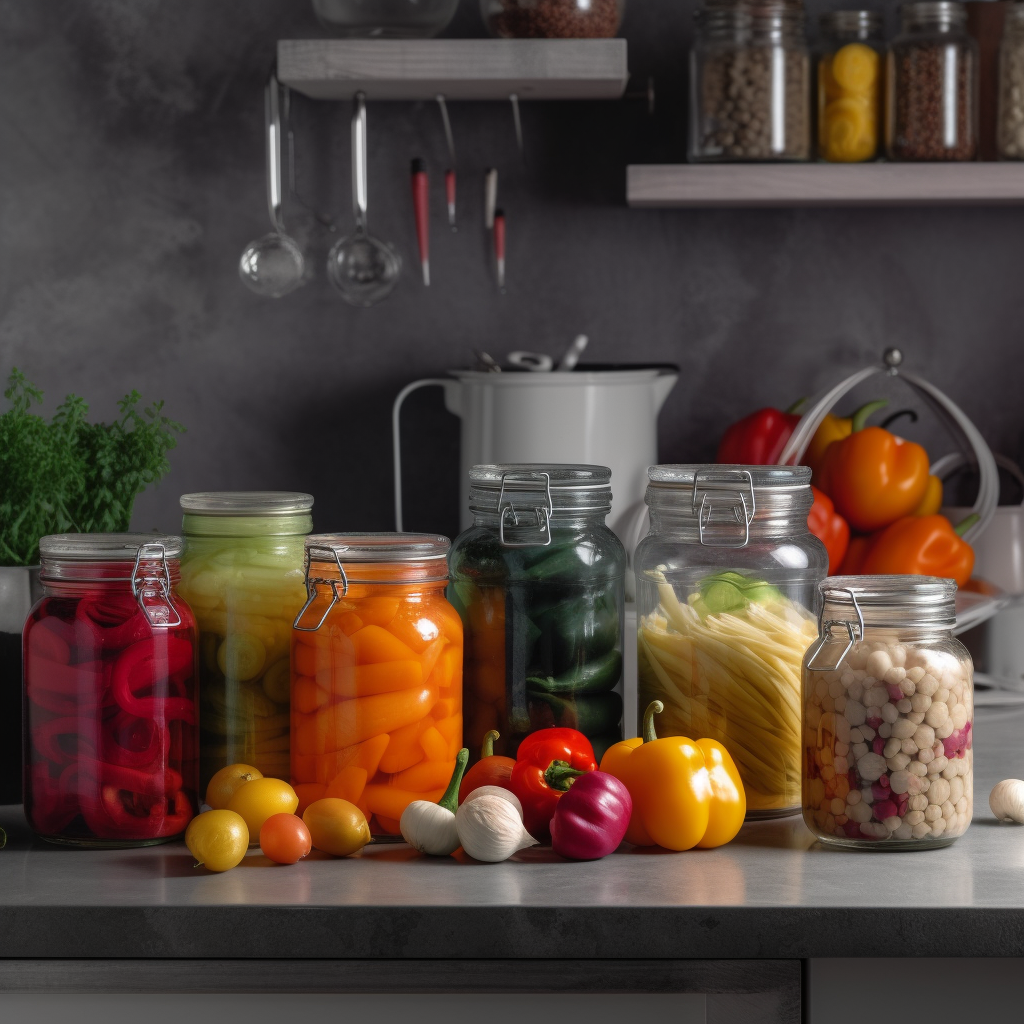
7. Preserve Your Survival Crops
Preservation methods like canning and drying allow for long-term storage. Canning, pickling, freeze drying and fermenting are all traditional methods of preservation that can extend the life of your crops and add variety to your diet.
For instance, cucumbers can be pickled, tomatoes can be canned, and cabbage can be fermented into sauerkraut.
Preserving your food can be a rewarding and practical skill in a survival situation. It allows you to make the most of your harvest and ensures you have nutritious food year-round.
FAQ About the Best Survival Crops
What is the best survival food to grow?
The best survival crops to grow will keep you nourished and healthy during difficult times. Potatoes, my friend, are the answer to your survival food dilemma.
Why potatoes? They’re packed with carbohydrates, providing the energy you’ll need to face challenges head-on. Not only are they incredibly nutritious, but they’re also easy to grow and have a high yield.
What is crop rotation?
Crop rotation is the practice of planting different crops in the same area over sequential seasons. It’s an important part of maintaining soil health and ensuring a good yield.
By rotating crops, you can prevent the buildup of pests and diseases and enhance soil fertility.
What vegetables are best for survival?
Kale and spinach are your green saviors! These nutrient-dense leafy greens will provide essential vitamins and minerals, ensuring you stay healthy and strong even in the most uncertain times.
Beans and peas, on the other hand, are packed with protein and fiber, offering you the energy and sustenance you need to face any challenges. They also fix nitrogen in the soil, improving its fertility for future crops.
Carrots and beets are resilient root vegetables that can withstand harsh conditions, making them ideal for survival situations. Their high yields and ability to store well ensure that you’ll have a consistent food supply.
What is the most resilient vegetable to grow?
Potatoes are not only incredibly hardy, but they’re also incredibly versatile. They can grow in various climates and soil types, from the arid deserts to the frosty mountains.
These tubers are packed with essential nutrients, such as vitamin C, potassium, and complex carbohydrates, which offer you energy and nourishment during tough times.
Moreover, potatoes can be stored for months without refrigeration, ensuring a reliable food source throughout the year.
What is the easiest crop to farm?
One of the best survival crops for beginner farmers to plant is lettuce.
It’s a game-changer when it comes to effortless gardening and survival as it’s adaptable to various soil types and weather conditions.
Wrap UpOn The Best Survival Crops
Each day that passes without you taking action is a day closer to potential food scarcity. Remember, time is of the essence.
And in a world that’s changing as quickly as ours, securing your food supply is no longer a luxury – it’s a necessity.
So why wait? Start planning the best survival crops in your garden today and take a step towards a more secure and sustainable future.
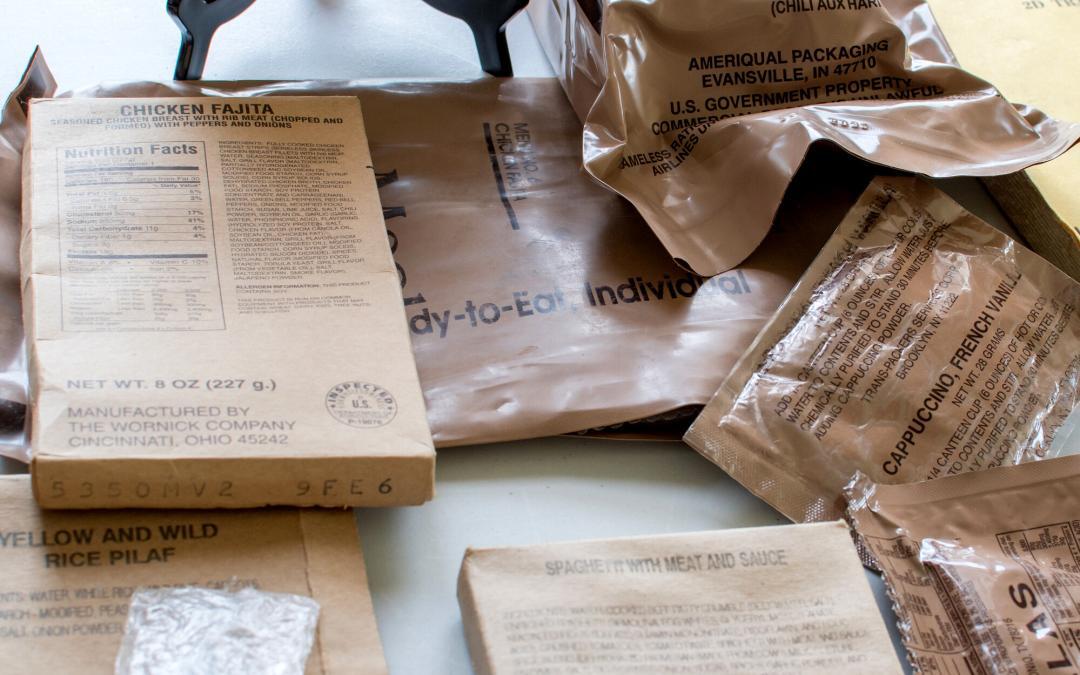
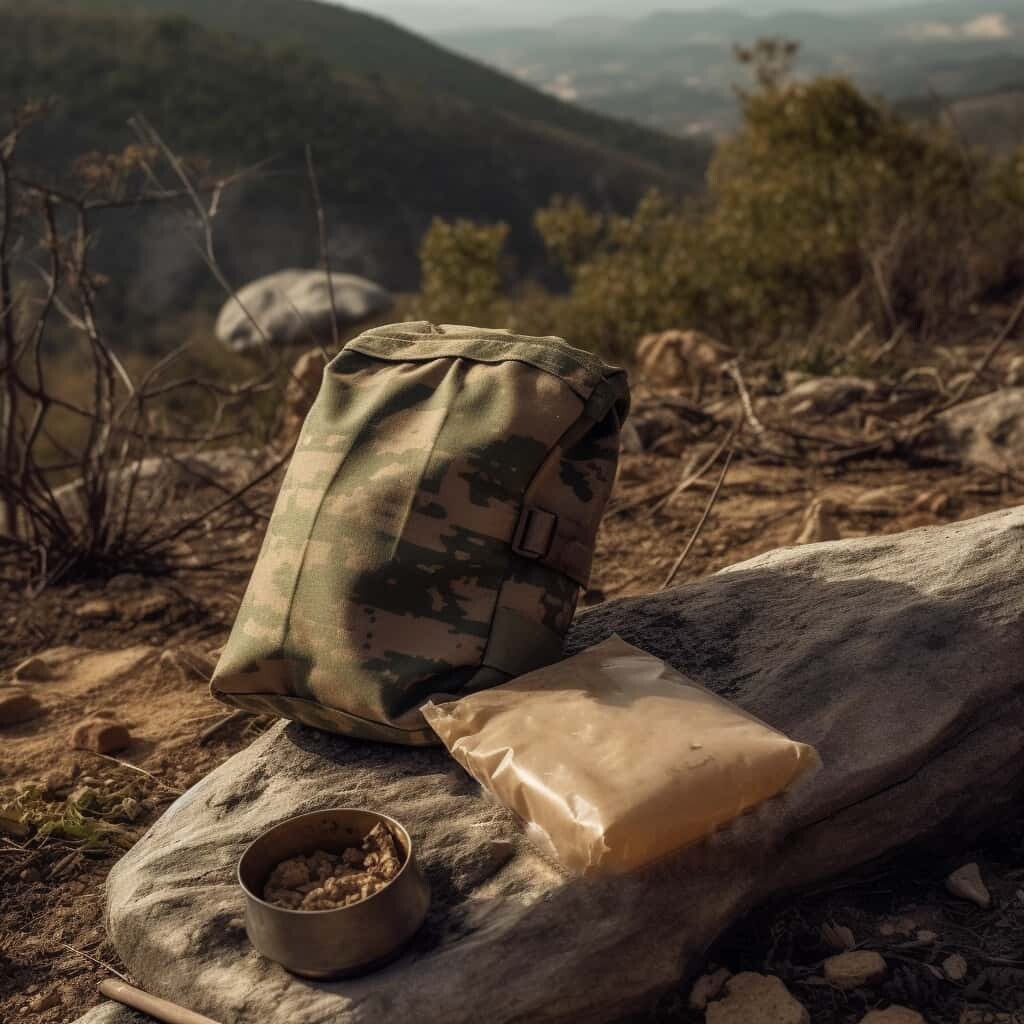
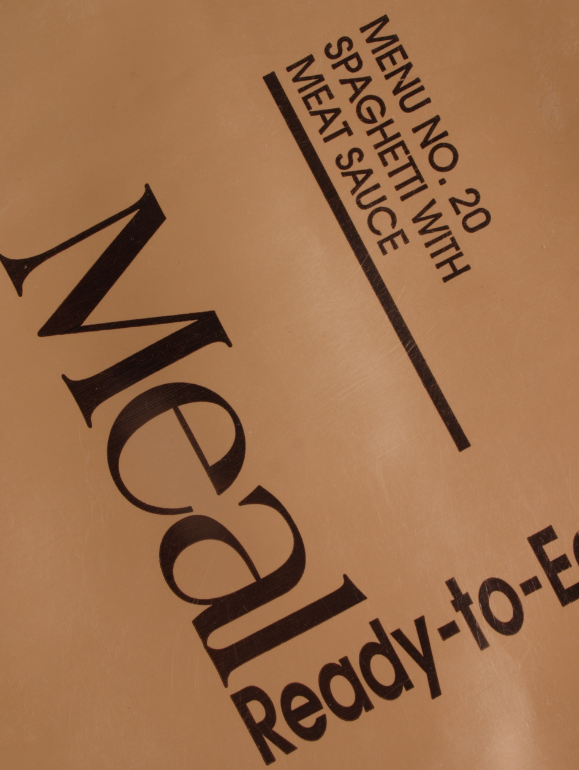
How long do MREs last is a crucial question for those planning to stock up on emergency rations or preparing for outdoor adventures.
MREs are the military’s go-to self-contained meals. They are complete meals in flexible bags, so you can eat without cooking in an emergency.
MREs can last for up to 5 years or more when stored at a temperature of 75°F or less. Storage conditions and the age of the MRE can affect their taste, texture, and nutritional value. It is recommended to rotate them regularly and replace any beyond their expiration date.
Read on as we’ll delve into the composition of MREs, their shelf life, and other important aspects.
An MRE, or Meal Ready-to-Eat, is a self-contained food package designed for quick and convenient nourishment. Military service members use MREs in situations that need a reliable food source.
They have been used during times of war or training for combat when other food was unavailable. Plus, MREs have been given out to civilians for daily rations during wars or after natural disasters for humanitarian relief.
They contain a pre-cooked meal packaged and sealed in airtight plastic pouches designed to be shelf-stable with a long shelf life and come as individual meals.
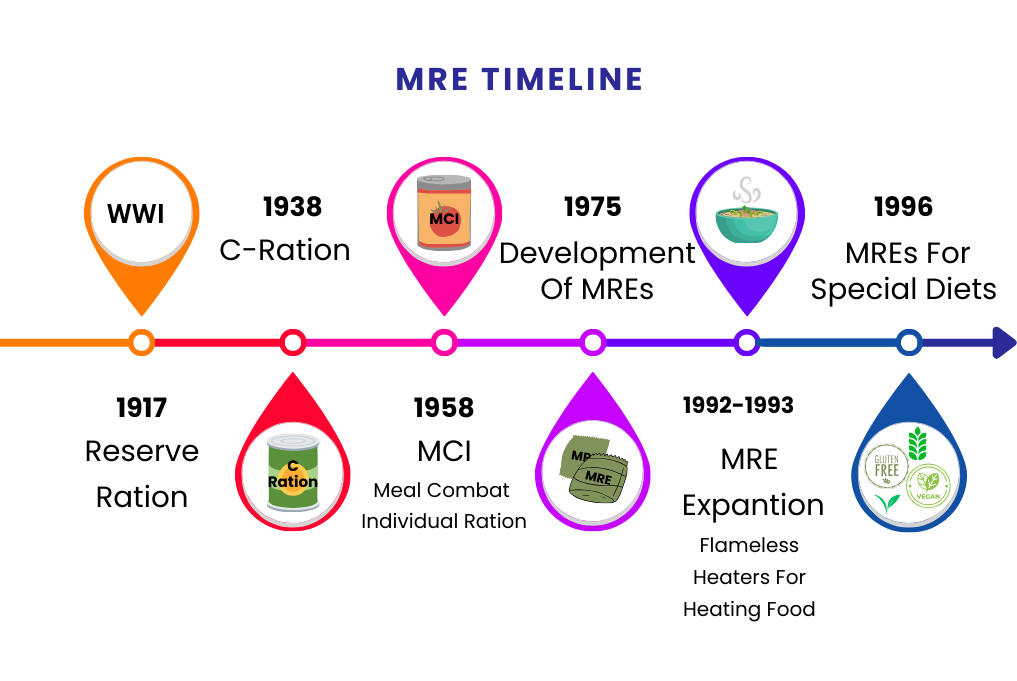
History Of MREs
MREs have seen significant improvements since their introduction in 1983, the US Military and Department of Defense have worked together to enhance their nutrition and taste.
Before MREs, soldiers had to rely on less popular food rations like “C Rations” (prepared wet food) and “Reserve Rations,” which lacked variety and nutritional adequacy. Reserve rations were used during WWI and usually consisted of hard tack biscuits and jerky.
The Meal, Combat, Individual (MCI) ration replaced C Rations in 1958 but was still disliked by soldiers. In 1975, the first MRE was developed, offering improved portability and nutrition, although taste and texture were initially not well-received.
Other versions, like the MRE-XIII addressed these issues by expanding menus and introducing new items. In 1992, the Flameless Ration Heater was introduced, increasing calorie intake for soldiers in the field.
Specialized diets like vegetarian and gluten free options were also included. Today, the Continuous Product Improvement (CPI) program collaborates with soldiers, dietitians, engineers, and scientists to refine MREs based on soldiers’ preferences and needs.
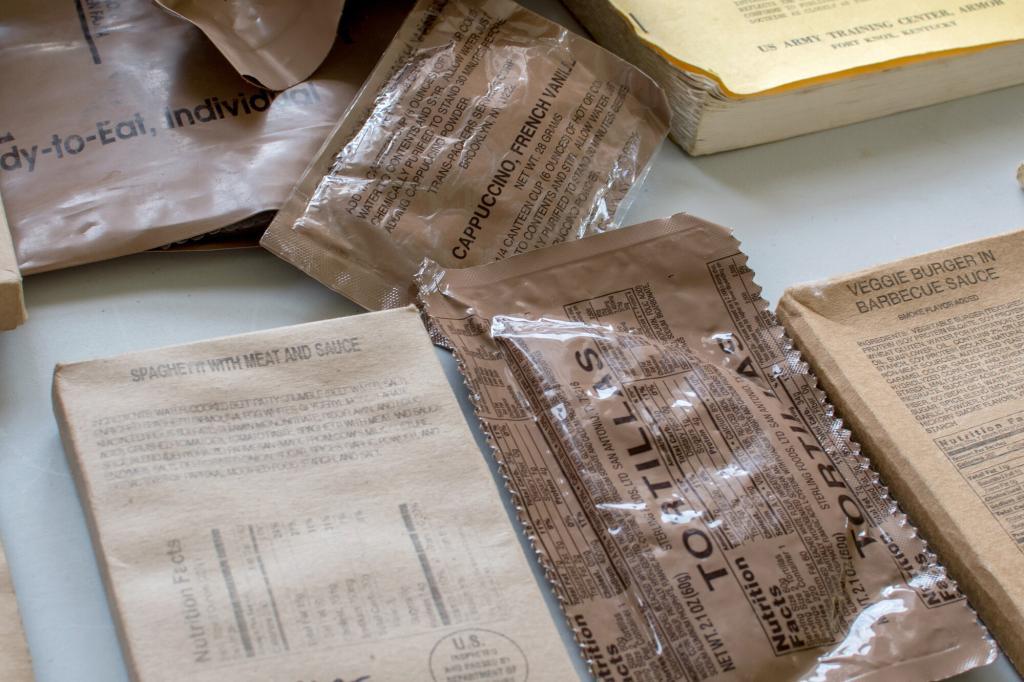
What Do MREs Contain?
Each MRE contains a main course, side dish, dessert, and various accessories like utensils or condiments. Most of them contain an entrée, side dish, dessert, snacks, candy, and a beverage mix. Some meals also include condiments like hot sauce and salt packets.
Why Should I Stock Up on MREs?
Stocking up on MREs provides a secure food supply for situations like natural disasters or prolonged outdoor activities. They’re lightweight, convenient, and last long. An MRE is handy since everything you need comes in one bag.
Also, it contains the essential nutrients to keep you nourished if you have no access to fresh food.
Some MREs come with amenities like toilet paper, which could be essential in emergencies. Some include flameless ration heaters to warm your meals when you don’t have access to a stove or grill.
While the military developed MREs for their troops, they are now available to the public. You can get them from anywhere, at any time of the day. But they are especially important during emergencies.
Now manufacturers offer more MRE options to meet different dietary needs. For instance, there are now low-sodium, gluten-free, and vegetarian MREs.
But, one drawback is that MREs are more costly than freeze dried alternatives. Other cons are that MREs are cumbersome and hard to find in supermarkets.
MREs can be purchased at army surplus stores, gun shows, eBay and Amazon. Be careful when purchasing because not all items labeled “MRE” are the true US military brands that your looking for. Plus, you always want to check the labels and dates.
MRE Labels And Their Meaning
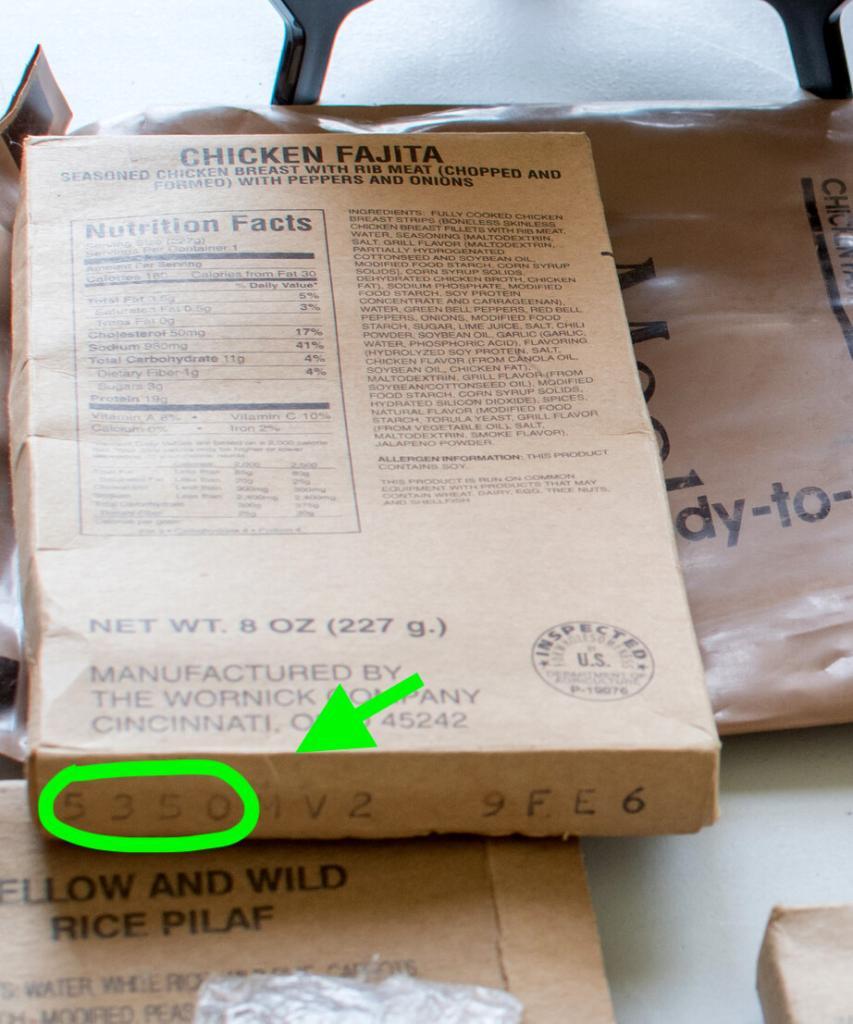
MRE labels hold critical information regarding the food’s origins, nutritional content, and more importantly, its longevity. MRE manufacturers do not put traditional expiration dates with a day, month, and year. Their shelf life depends on how you store them.
Remember that the date on an MRE is not an expiration date but an inspection date. Instead, you’ll see the “production date” and “MRE inspection date” on the package.
Inspection Date
The inspection date on the MRE label indicates when the meal should be examined for quality and safety. This date might be three to five years after the packaging date. It depends on the product. It indicates when you should examine the food for signs of spoilage.
Manufacturing Date
The manufacturing date reveals when the MRE was created, a key factor in estimating its shelf life. The manufacturing date is a four-digit number. The first digit represents the year. The next three digits specify the day.
The downside is using a single digit to denote a year makes it difficult to tell between various decades.
How to Determine the Expiration Date of MRE
Determining the expiration date of an MRE is crucial for safe consumption and effective planning. But if there is no expiration date, then when do MREs expire?
Well, MREs use a four-digit system called Julian’s Date to determine their expiry. This system originated in ancient Rome. Many companies also adopted this calendar system for dating their goods.
To make things easier, most people use an MRE expiration date calculator online, like the ones from MRE Info or Meal Kit Supply to determine an MRE’s age. But you can also figure it out yourself. Here’s how:
For example, the number 7068. The first “7” represents the year (2007). Then, the following three digits (out of 365 days a year) represent the day of the year of shipment. So, 7068 states March 9, 2007, which is day 68 of 2007.
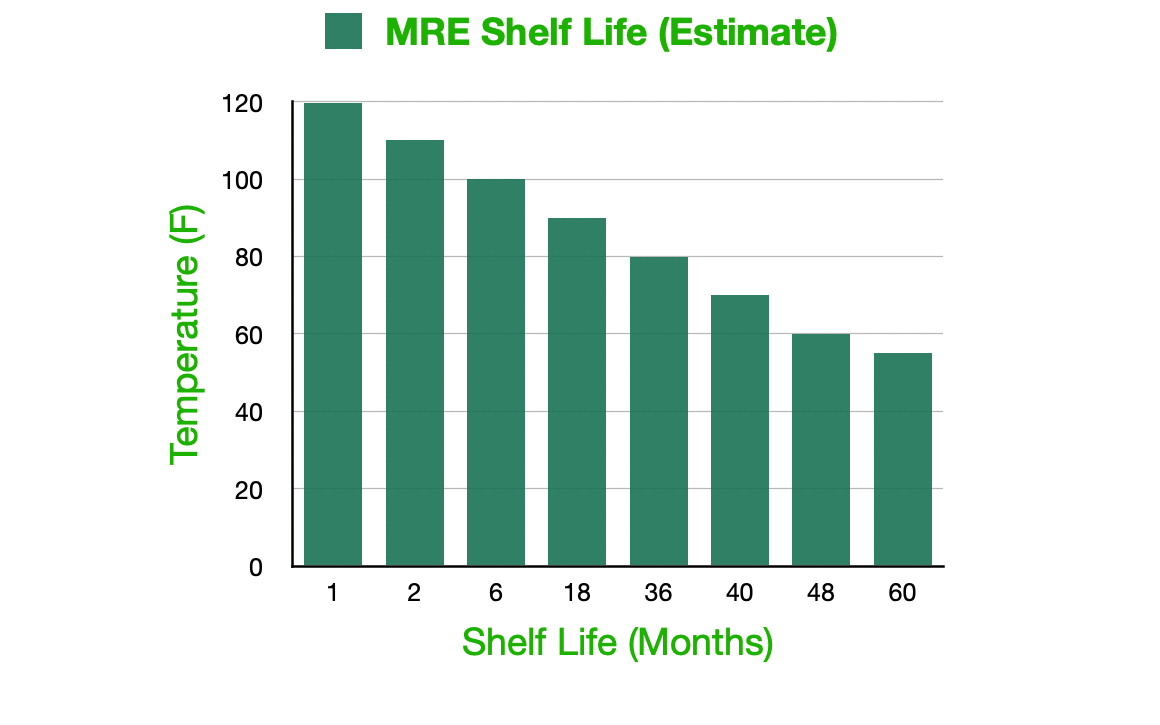
MRE Shelf Life Chart
An MRE shelf life chart can serve as a helpful guide to understanding how long your food will last under varying conditions. MREs have a shelf life of five years as long as you store them well.
This chart provides an overview of how long MREs last after the inspection date:
Some MRE cases come with a time and temperature indicator made of two concentric rings. The MRE has gone bad when the inner circle becomes darker than the outer circle. This means it’s over its expiration date due to exposure to high temperatures. (See the video below for more information.)
Knowing how long each meal will last is important if you are stocking up on MREs for an emergency.
Also, remember that certain ingredients in an MRE may go bad faster than others. Examples are cheese and other dairy-based products with a shorter shelf life.
H/T to @gschultz9 for the video: MRE Basics Time Temperature Indicator
How Do MREs Last So Long?
MREs are engineered to last for extended periods, thanks to unique preservation techniques and packaging. Before packing, manufacturers boil MREs to remove any remaining microorganisms.
The sterilization and packaging processes make MREs completely free of bacteria and contaminants.
These measures give MREs a longer shelf life than conventional food. So you can store them for years in a dark, cool place without going bad.
Some MREs have preservatives, although using much is less common than you may believe. Instead, MREs contain excessive amounts of salt. Salt acts as a natural disinfectant by drawing moisture out of bacterium cells.
MREs have more salt content than ordinary processed meals. That’s why you may store them longer without going bad.
Also, the MRE packaging contributes to their long shelf life. It inhibits the development of germs because of the container’s airtight nature. MRE packages are sterile until you open them.
Can You Eat Expired MREs?
It’s not recommended to eat expired MREs because eating past the expiration date can be dangerous. Expired MREs pose certain health risks, even if they may be edible under certain conditions.
Expired MREs may become contaminated with germs and microbes that can cause sickness. If an MRE has passed its expiration date, you should discard it immediately.
If you want to stock up on MREs, check their expiry dates to ensure you get edible food during emergencies.
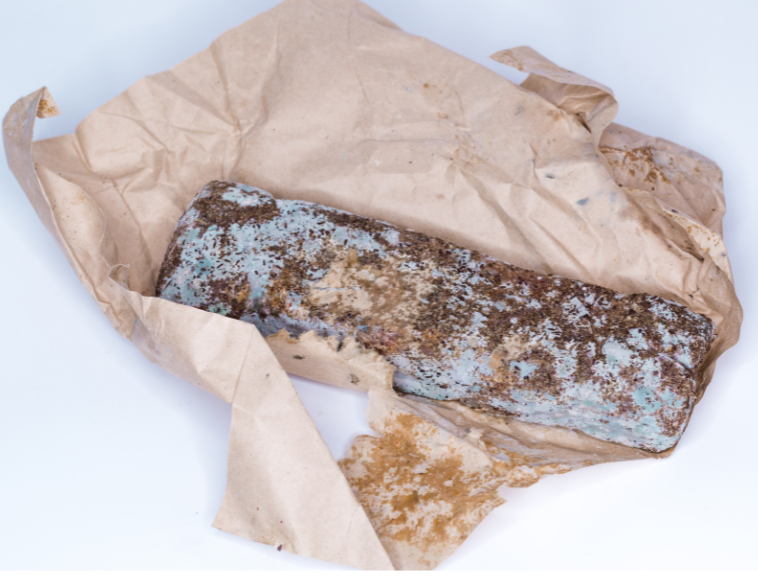
Signs Of Spoilage
Obvious signs such as bad odor or discolored food indicate spoilage, so you should avoid consuming the MRE. Don’t consume the contents of your MRE packs if you see punctures, ruptures, or swelling.
Ruptures mean there’s a chance air got in and damaged the food. Bloated packaging is a sign that there are botulism-causing bacteria inside.
You should also discard your MRE if exposed to temperatures that might spoil the food. If you open your MRE and notice that the food smells or tastes off, throw it away.
Key Takeaways: How Long Do MREs Last?
Knowing how long MREs last is crucial for emergency preparedness and outdoor adventures.
Always check the expiration date if you decide to buy them. It’s always best to ensure you’ll have a reliable food source if needed.
With all this in mind, there’s no doubt that MREs can be an integral part of your prepping journey. With all this information, it’s time to stock up on MREs —so why not start today?
Freeze dryer machines have revolutionized food preservation by employing advanced sublimation techniques. By efficiently removing moisture while maintaining food’s structure, they play a critical role in extending shelf life.
When it comes to food preservation and emergency preparedness, freeze drying is a game-changer in my opinion. Not only does it preserve food for up to 25 years, but it also helps retain flavor, nutrients, and texture.
As home freeze drying machines become increasingly popular, preserving food at home is becoming easier and more efficient than ever.
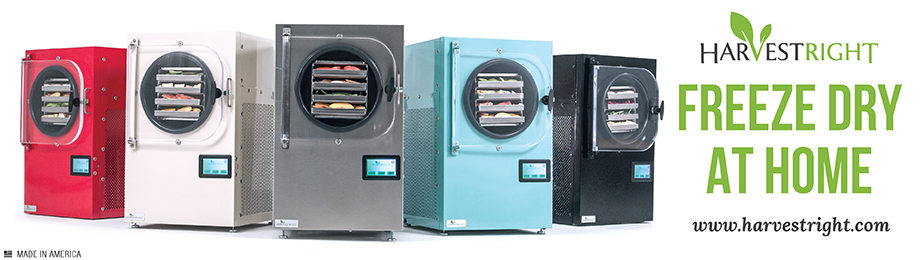
Top 3 Best Freeze Dryer Machines for Home Use
When it comes to home freeze dryer machines, there is one clear stand out on the market. HARVESTRIGHT Freeze dryer machines are the top choice, but they are not cheap.
That being said, at the time of writing this article the company offers a layaway plan making it more affordable for everyone. These heavy duty freeze dryers are made with high-quality materials and components that can withstand years of use and they come with a limited 3 year warranty.
Plus, they are easy to operate, with user-friendly controls and intuitive interfaces that make freeze drying food a breeze. Again, they are expensive, but they are built to last and are a great investment for anyone committed to food preservation.
The medium-sized HARVESTRIGHT machine is great for families or individuals who want to preserve larger quantities of food. It can process up to 8-13 pounds of food per batch and freeze dry up to 312 gallons in a year.
It’s only a bit bigger than the small version of the freeze dryer and comes with 4 trays. So, it’s still compact and will fit your countertop. (Dimensions: 19″W x 25″D x 29″H) 112lbs.
HARVESTRIGHT’s Small Freeze Dryer is the perfect freeze dryer machine for home use. Its slim build also ensures it can fit into any kitchen without taking up too much space.
This freeze dryer is ideal for those with a small family or who wish to make smaller batches. It also has three trays and can process up to 4-7 pounds per batch – making it an ideal choice for limited households. (Dimensions: 17.4″W x2 1.5″ D x 26.8″H) 61lbs.
The Large HARVESTRIGHT Freeze Dryer is a must-have for those who need to store and preserve food for a larger household. Its capacity makes it ideal for preserving large quantities of your favorite dishes.
It can process up to 15-23 pounds of food per batch and freeze dry 546 gallons of food in a year. (Dimensions: 21.3″W x 27.5″D x 31.3″H) 138lbs.
Freeze dryers are machines used to preserve food for long-term storage. They can preserve fruits, vegetables, meats, dairy products, herbs, and spices.
How Does a Freeze Dryer Machine Work?
Freeze dryers work by dehydrating food through the process of sublimation. This removes all the moisture from food or other items you want to preserve.
First, you put the food in the machine, then the machine freezes it.
Next, the machine uses a special process called sublimation to remove all the ice crystals from the food. This process takes several hours, even a day, depending on how much food you put in the machine.
Once the process is complete, you can store the freeze dried food in mylar bags or jars.
Choosing the Right Home Freeze Dryer
Here are some of the most important factors to consider when purchasing a home freeze dryers:
Size
Consider the space in your home when choosing a freeze dryer machine. The size must align with available space for optimal operation and convenience.
The freeze dryer should fit easily into your kitchen. Measure the space you have available before deciding on the size of the freeze dryer machine.
Capacity
Contemplate the volume of food you intend to preserve. A suitable capacity ensures your dehydration needs are consistently met.
If you have a large family or plan to store a lot of food, you will need a machine with a larger capacity. HARVESTRIGHT for example, offers freeze dryers with sizes ranging from small to extra large. Decide how much food you’ll be freeze drying before making your choice.
Ease of Use
Home freeze dryers should have user-friendly features. Look for freeze dryers with intuitive controls, clear instructions, and helpful features such as a timer or auto-shutoff.
Also, check the noise levels when selecting a freeze dryer machine. Some models can be very loud when running.
Temperature Regulation
Since freeze drying requires precise temperature regulation, choose a freeze dryer machine with accurate temperature control features. This will ensure that freeze dried foods maintain their quality and texture.
Quality
Look for a machine that is made with high-quality materials and has a solid performance. Also, check the warranty offered by the manufacturer.
HARVESTRIGHT offers a three-year limited warranty on its machines, which gives customers peace of mind knowing they can rely on their investment.
Price
Home freeze drying machines vary in their cost, depending on the size and features. It’s important to consider the features you need and how often you plan to use the freeze dryer before deciding.
Customer Support
Lastly, consider the customer support services provided by the manufacturer. If you have any questions or concerns about your freeze dryer machine, you should be able reach out to the manufacturer for assistance.
Benefits of Using Home Freeze Dryer Machines to Preserve Food
Extended Shelf-Life
Freeze dried food has an extended shelf life, which is significantly longer than other preservation methods. This means you can stock up on food for emergencies or extend the shelf life of your everyday groceries.
When food is freeze dried, all of the moisture is removed, which helps prevent the growth of bacteria and other harmful organisms. As a result, freeze dried food can last up to 25 years when stored properly.
Maintained Flavor and Nutrition
During freeze drying, the food is carefully preserved at a low temperature and under a vacuum. This nutritional preservation allows the food to retain its natural flavor, texture, and nutritional content, including important vitamins and minerals.
Unlike canned or dehydrated food, freeze dried food doesn’t lose its taste or texture over time. This means you can enjoy the same delicious and nutritious meals you love, even years later.
Versatility
With a freeze dryer machine, you can choose which foods to preserve, how much to preserve, and how to store them. You can freeze dry various foods, including fruits, vegetables, meats, and even entire meals. This allows you to create a stockpile of food that meets your specific dietary needs and preferences.
Convenience
A well-designed freeze dryer machine simplifies the preservation process. Once you have prepared your food for preservation, place it in the machine and let it work. There is no need to constantly check on the food or rotate it, as you would with other preservation methods.
Additionally, freeze dried food is lightweight and easy to store, making it ideal for camping trips, road trips, and other outdoor activities.
Cost Savings
By preserving seasonal produce, meats, and other foods, you can avoid paying higher prices for out-of-season or imported items.
Also, you can buy food in bulk when it is on sale or in season and then preserve it for later use. This can help reduce your overall food costs and allow you to stretch your budget further.
Effective Storage for Freeze-Dried Food
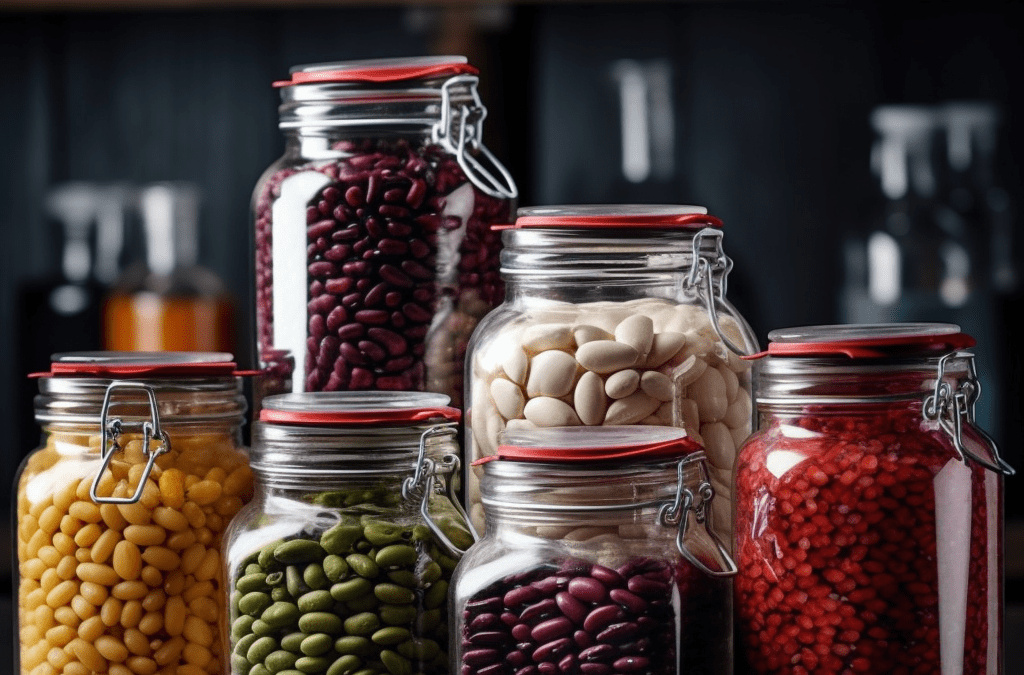
Some prefer vacuum sealing dried food as a storage option to remove the air and protect food. However, you can store freeze dried food in mason jars, vacuum-sealed bags, or mylar bags with oxygen absorbers.
If you order directly from HARVESTRIGHT they include a starter pack of 50 mylar bags, 50 oxygen absorbers, sealer and a guide to freeze drying so you have everything you need to start storing food.
Mason jars are the most popular option because they provide an easy way to check on the food without opening it. However, they take up too much space.
Vacuum-sealed bags help keep the food more secure, and mylar bags and oxygen absorbers create an airtight seal that locks in the freeze dried food’s freshness.
How Much is a Freeze Dryer Machine?
Freeze dryers can range in price depending on their size and features. The HARVESTRIGHT medium home freeze dryer costs around $2,895 at the time of this article. Larger commercial freeze dryers can cost more. There is also the cost of running the machine. The video below gives you a good idea of this additional cost.
H/T to @1870s for this video: Understanding The Cost Of Using A Freeze Dryer.
What Can You Freeze Dry?
You can freeze dry almost any food, including fruits, vegetables, meats, cheese, rice, pasta, soups and even meals. Focus on foods that don’t require additional cooking or seasoning.
How Long Does Freeze Dried Food Last?
As mentioned, freeze dried food can last up to 25 years without losing flavor or nutrition. Freeze drying also helps retain the colors and shapes of foods, which makes freeze dried food more attractive than canned or frozen items.
Key Takeaways of the Best Freeze Dryer Machines
Always follow safety precautions when freeze drying food and keep your freeze dryer in a cool, dry place. Doing so will help ensure your freeze dried food is as nutritious and delicious as possible.
“How long do beans last?” is a question often posed by both culinary enthusiasts and everyday consumers. Vegetables like beans are a nutritional powerhouse – tasty, budget-friendly, and full of fiber, vitamins, and minerals.
They are also a great source of alternative protein in a SHTF scenario. So if you’re wondering if you can still eat those beans, you’re in the right place!
Read on to learn if that can of beans you found is safe to eat and don’t forget to check out our pro tips at the bottom of the page.
Can I Use Beans After Its Expiration Date?
Quick answer is yes, you can use beans after their expiration date if they have been stored properly and show no signs of spoilage. However, it’s important to check their quality before consumption.
Understanding Expiration Dates
Expiration dates help keep food safe and show how long a product stays at its best quality. You’ll see a “Best By” or “Use By” date on products.
“Best By” means the product will be at its best quality until that date.
“Use By” means you should eat the product by that date to be safe.
Optimal Storage Methods for Beans
Preserving the freshness of beans hinges on proper storage techniques. Cognates of beans, such as chickpeas and broad beans, also demand similar care. To properly store your beans for long-term storage, just keep in mind the following:
Keep them in a dark, dry, and cool place.
Keep canned beans in their original, unopened containers.
Store dried beans in airtight containers to prevent moisture and pests.
The following are options for airtight containers that can be used to store your beans long-term. You will want to add oxygen absorbers to help keep out any moisture.
[lasso id=”5″ link_id=”911″ type=”table”]
Lifespan of Canned Beans
Canned beans, especially popular variants like chickpeas and soybeans, have a different shelf life compared to their dried counterparts. Canned beans are usually safe to use beyond expiration if stored correctly.
Aside from the expiry date, here’s how to tell if canned beans are expired:
Bulging, leaking, or showing other damage
A strong, unpleasant smell when you open the can
Beans look slimy, discolored, or moldy
If you notice the signs above, or anything unusual, discard the beans and do not consume them.
Shelf Life of Beans
Type of Beans
Shelf-Life
Stored in Ideal Conditions
Dried beans
1 to 2 years
2 to 3 years
Canned beans
2 to 5 years
Up to 5 years
Cooked beans
2 hours
5-7 days (refrigerated)
How Long Are Dried Beans Good For?
Dried beans, including varieties like azuki bean, black gram, and green gram, can last significantly longer than their fresh counterparts when stored appropriately. Dry beans do not expire, and as they age, they might take longer to cook, and their texture might not be as good.
So how long do dried beans last? The shelf life of dried beans depends on storage conditions.
Here are some signs your dried beans have gone bad:
Musty or unpleasant smell
Mold growth
Insects or evidence of insect activity in the beans
If they show no signs of spoilage, you can go ahead and use them. Remember that they may require extra cooking time to soften and reach the texture you want.
Note: When using beans past their expiration date, ensure they are cooked well. This helps to minimize any potential risks.
What Beans Are High In Protein?
Beans, notably soybeans, lupins, and peas, are often sought after for their impressive protein content, beneficial for various diets and nutritional needs.
If food becomes scarce and you need to add some fiber and protein to your diet, beans are a great option to have in your pantry. See the chart below to find the best choice for your needs.
Expired beans may still be edible if stored properly, but their nutritional value could diminish over time.
As beans age, they may lose some vitamins, minerals, and overall quality. If you’re unsure about their condition, it’s safer to discard them to avoid potential health risks.
What is the proper way to store beans?
Store beans in a cool, dry place, away from direct sunlight. Keep canned beans in their original, unopened containers, and store dried beans in airtight containers.
How do you know if dried beans are too old?
Look for these signs like unusual smell, mold or bugs, a stubbornly hard texture even after soaking and cooking, or extra wrinkly skin.
If you spot any of these signs, discard them immediately.
Wrap Up: How Long Do Beans Last After the Expiration Date?
Always remember to store your beans the right way and give them a quick inspection before using them.
Storing food for emergencies is important, and beans make a fantastic choice for emergency food supplies. Just don’t forget – safety comes first when handling food.
Pro Tip: Did you know you can add bay leaves to your food storage to ward off any bugs?
Most bugs and mice do not like the scent and this little trick can come in handy to help preserve your long-term food storage.
When looking to purchase 5 gallon food grade buckets, check your local bakeries and restaurants. My local bakery sells their used buckets with lids for $5 a piece. You can always buy replacement lids if the lids are damaged or do not come with them. This is a great money saving tip to stretch your prepper budget.